Step 1: Install the Fine Print program on your computer click here for version 6.12 Choose RUN. The Fine Print printer will install. Choose the option "NOT the default printer". DO NOT install if you already have Fine Print. To check, click the windows start button and look in "All Programs". Obviously, you should do this step only ONCE!
Step 2: Print your 1099s from Quickbooks (or other program) to Fine Print: Open Quickbooks (or other Windows program) and do whatever is necessary to print your 1099-Misc forms on the IRS pre-printed paper forms (just as if you were going to print them on paper). Somewhere in the printing process (or before the printing process) you should be able to SELECT A PRINTER. Choose FINE PRINT as the printer (instead of your laser printer), then continue as if printing on paper.
Step 3: Save your FinePrint file (*.fp):
A window will appear asking your to purchase online... Click OK and purchase later if you choose to. Your 1099 pages will appear on screen. Two forms per page. Just like what would have printed on pre-printed forms. Be sure 1-up is checked at the top left under Layout.
Near the TOP, click the "Picture of a Diskette". This is a little black thing with white lines. When holding your mouse over it, the words Save (Ctrl-s) appear. Click it. A "Save As" Window will appear.
At the TOP of THE SAVE AS WINDOW, the save folder can be "FINE PRINT FILES" under My Documents, or any folder you choose.
At the Bottom of the SAVE AS WINDOW be careful to set:
1. Your Filename: Change the filename from Intuit, Peach or whatever it says, to a simple abbreviation for your company, for example "Jones2014" (do not add a filename extension).
2. The File Type: Set "Save As Type" says FinePrint (*.fp).
Then click SAVE.
At this point 1099 Express will finish the import for you at no cost. If you wish 1099Express to finish the import for you, click here to send the file just saved: www.1099Express.com/Service_Bureau.asp then click the SECURE SEND LINK. Be sure to notify us using the "Notify Link" so we can process the import.
To continue the import yourself, please continue with step 4.
Step 4: Save your metafiles: Your 1099-Misc data should visible be on the screen in the FinePrint program. If not, simply bring it back by navigating to the ".fp" file you saved in step 3 and double click to OPEN it. Your 1099-Misc data will be visible in Fine Print.
Click the SAVE Button again (just as in STEP 3 above). Except this time Set "Files of Type" to METAFILE. Do not change the filename. Then click SAVE. FinePrint will create one metafile for each page. For example, if you have 100 payee forms (2 forms per page) you will have 50 metafiles.
Step 5: Open your metafiles into 1099Express and scale input. Close the Fine Print program. Bring up the 1099Express program.
Inside 1099Express, click the File Menu, then "Open Metafiles" (near the bottom of the FILE Menu). A full screen view of two 1099-Misc forms will appear. Click BUTTON NO. 1 labeled "1. Convert Metafiles to Text".
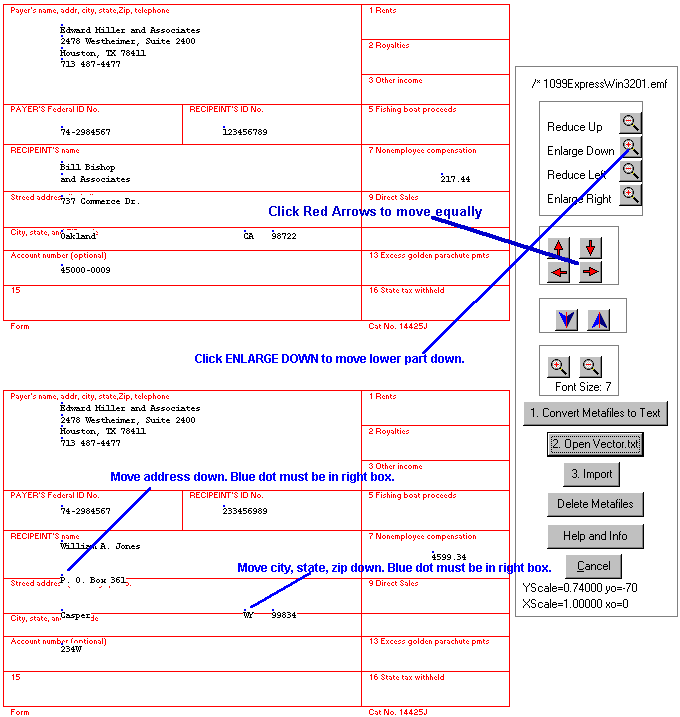
Be sure the "Look in:" folder is set to FINE PRINT FILES or where your metafiles are stored. You should see all of your metafiles. Notice metafiles end with the ".emf" extension. At this point double click on the FIRST METAFILE numbered 001. This will open them all! It will save the data into a single file called Vector1.txt, and delete each metafile from disk. Next Click BUTTON NO. 2 and open the file called Vector1.txt. Your 1099 data should now be visible on the red form, similar to the example, shown below.
Scaling Your Data:
The data should be in the correct box! Press the BLUE UP-DOWN arrows to scroll through the pages and visualize each page. If the data fits the form on all pages, then CLICK THE IMPORT BUTTON, to bring your data into 1099 Express.
Note: JUST THE BLUE DOT needs to be in the correct box. If the text is touching a red line, it's OK, as long as the blue dot is inside the correct box. If the data is off, USE THE RED ARROWS FIRST! Normally, do not use the Magnifying Glass button "Reduce" and "Enlarge". Do not use them unless absolutely necessary.

Step 6: Correct any errors found by 1099 Express and SAVE your file from 1099 Express. YOU ARE DONE!
Note: Each time an import is performed a new vector file is created such as Vector1.txt, Vector2.txt, Vestor3.txt, etc. There will remain one VectorX.txt file for each group of metafiles imported. Thus, if there are problems, either the .fp file or the corresponding VectorX.txt file can be re-opened and revisited, without creating them again from Quickbooks, Peachtree or another application. If you are having problems, send us the .fp file created in step 3.