
Master the software.
Full instructions for using the program — quick-start guides, video walkthroughs, and detailed feature breakdowns.
Creating an Account
Register for a 1099Express account, verify your email, and add or update your Account Owner information.
Navigate to the 1099Express website and click the Create Account button located at the top orange banner.
- On the login page that appears, click the orange Create A New Account button located below the blue Login button.
- On the Register page, enter details into the following fields:
- Password
- Confirm Password
- Check the box next to I'm not a robot to complete the security check.
- To complete the process click Register at the bottom of the form.
- An email will be sent to the email used for the account creation form to verify the email.
*Note: the specific requirements listed on the right side of the screen (must be at least 12 characters long and contain at least one digit, one special character, one uppercase letter, and one lowercase letter).
How to Add or Edit Account Owner Information
How to Add Account Owner Information
At the time of purchase, the Account Owner information will be required to be filled-out at the right of the purchase screen.
How to Update Account Owner Information
- In the top-right corner of the screen, click the Username at the top right of the page.
- Select Account Owner from the dropdown menu.
- In the Account Owner window, fill out or update the required fields:
- Name 1 and Name 2 (Optional)
- Street Address, PO Box, and Apt/Suite/Space (Optional)
- City, State, and Zip Code
- Entity to Foreign (checkbox, if applicable)
- Contact Name and Title
- Contact Email and Phone Number
- Click the orange Save Account Owner button at the bottom left of the window.
- Click the blue Close button or the X in the top-right corner to exit the screen.
Issuer Information
Add a new issuer, edit issuer details, or delete an issuer you no longer file for.
How to Add Issuer Information
- At the top of the grid, click the orange Issuer menu.
- From the dropdown list, select Issuers.
- In the data entry window that opens, click the Add New Issuer button.
- Complete the form and enter all required information:
- TIN: Enter the Employer Identification Number or Tax Identification Number.
- Contact Type: Choose between Person or Business from the dropdown.
- Name 1 (Name 2 is optional)
- Street Address, PO Box, and Suite, Apt No, etc.
- City, State, and Zip
- Contact Name and Contact Title
- Contact Email and Phone Number
- After completing the form, click the blue Save button at the bottom of the window.
Bulk Importing Issuer Information
If your issuer data is exported as a filers.txt file, you can convert it to Excel first using the steps below. This won’t complete all the formatting automatically, but it will get the bulk of the work done.
Import Through the Data Tab (Recommended)
- Open a blank workbook.
- Go to Data → Get Data → From File → From Text/CSV.
- Browse to and select your .txt file.
- Review the preview and select the correct delimiter.
- Click Load to import the data.
Once your data is formatted to the template, import it into 1099Express:
- Click the Issuers drop-down in the Application and choose Issuers.
- Select Import from File at the top of the data window and choose a file.
- Navigate to the Excel file, select it, and click Open. The file name should appear in the window.
- Click Import.
- Confirm that your Issuers were added. Continue to import more, or close the window when finished.
How to Edit Issuer Information
- Select the Issuer menu at the top of the grid and click Issuers from the dropdown.
- Click the Edit icon at the left of the issuer’s name.
- In the form window that opens, update any required fields (such as TIN, Contact Type, Name, Address, State, or Contact Details).
- Click the blue Save button at the bottom of the form and close the window after update is complete.
How to Delete an Issuer
- Select the Issuer menu at the top of the grid and click Issuers from the dropdown.
- Locate the issuer that needs to be removed and click the ‘X’ (delete) button.
- When the confirmation popup appears asking "Are you sure you want to delete this company? The action cannot be undone.", click OK.
- A prompt will appear confirming the issuer was deleted. Click OK to close the message.
Create a File
Create a file, choose your form and tax year, and create your file.
How to Create a File
- At the top left of the grid, click the blue Create File button.
- A warning will appear stating "Company not selected, please select one or create one", click OK.
- Under Select Issuer, click the dropdown menu and select the appropriate Issuer. (Alternatively, click the orange + Add button to enter new issuer information.)
- At the left of the window, enter or select the following information:
- Select Form (Ex. 1099-NEC, 1099-MISC, etc.)
- FormType (Original, Correction or Replacement)
- TaxYear
- Phone Number (Enter a valid phone number)
- Review the populated information in the form on the right to ensure it matches the correct Issuer data for the file.
- Click the orange Save Issuer & File Details button at the bottom of the window to complete the process.
Manually Entering Recipient Data
Add, edit, and delete recipient forms inside an open file.
How to Add Recipient Information
- Above the grid, click the blue + Add Form button. (Alternatively, navigate to the Edit menu and select Add Form.)
- A form will appear, fill out all necessary information.
- Once completed, click the blue Save [[Ctrl+S]] button at the bottom left to save the current entry and close the window.
- Or, click Save and New [[Ctrl+U]] to save the current recipient and immediately start adding another form.
How to Edit Recipient Information
- With the file open in the grid, locate the desired recipient that requires changes.
- On the far left of the recipient’s name, click the Edit button.
- In the Form window, update any necessary fields (e.g., First Name, Last Name, Address, TIN, or financial amounts).
- Click the blue Save [[Ctrl+S]] button at the bottom left of the window to apply the changes and return to the grid.
How to Delete a Recipient Form from File
- With the file open in the grid, locate the desired recipient that needs to be removed.
- On the far left of the recipient’s name, click the ‘X’ (delete) button.
- Confirm the deleted record by clicking OK on the pop-up window.
Import Recipient Data
Paste from Excel, import an Excel template, or import a .SRC file, then verify your records.
Importing (Paste from Excel)
- Copy Excel Data:
- Open the Excel template containing the recipient data.
- Select all the data including the headers down to the last recipient line.
- Right-click and select Copy (or press Ctrl+C on the keyboard).
- Open the Paste Import Window:
- Open the 1099 Express program and select the File menu.
- Select Paste from Excel from the dropdown.
- Paste Data:
- Click inside the text box in the Import dialog window to right-click and Paste (or press Ctrl+V).
- Import and Verify:
- Click the blue Import button below the text field.
- When the window appears stating "Import completed!", click OK.
- Validate Imported Records:
- Above the grid, click the blue Verify All button on the top of the page to validate the newly imported recipient forms.
- Once the processing bar reaches 100%, click Close to view your verified forms.
- Be sure to review recipient information for accuracy.
How to Import from Excel
- Select File menu and click Import from Excel from the dropdown.
- In the Import dialog window, click the blue Browse Files button (or drag and drop your file into the designated area).
- Locate and select an Excel template file from the File Explorer, then click Open.
- After selecting a file, click the blue Upload button at the bottom of the window.
- Once processing finishes, click the blue Verify All button at the top of the grid to validate the newly imported records.
- Click Close after processing is complete.
- Be sure to review recipient information for accuracy.
How to Import an .SRC file format (1099Express file format)
- Select File menu and click Import from Excel from the dropdown.
- Drag and drop the .SRC file into the Import dialog window and click upload.
- Once processing finishes and closes, click the blue Verify All button at the top of the grid to validate the newly imported records.
- Click Close or Print after validation is complete.
- Be sure to review recipient information for accuracy.
Excel Templates (Downloads)
Download a sample Excel template for the form you are filing, enter your recipient data in the same column order, then use Paste from Excel or Import from Excel to bring it into 1099 Express.
1099 Express Templates
| Form | Template |
|---|---|
| 1099-DA | Download Excel Template |
| 1099-OID | Download Excel Template |
| Form W-2G | Download Excel Template |
| 1099-DIV | Download Excel Template |
| 1099-R | Download Excel Template |
| 1099-INT | Download Excel Template |
| 1099-S | Download Excel Template |
| 1099-K | Download Excel Template |
| 1098-MORT | Download Excel Template |
| 1099-MISC | Download Excel Template |
| 1098-VLI | Download Excel Template |
| 1099-NEC | Download Excel Template |
| Form 3922 | Download Excel Template |
1042-S Express Templates
| Form | Template |
|---|---|
| 1042-S | Download Excel Template |
W-2 Express Templates
| Form | Template |
|---|---|
| Form W-2 | Download Excel Template |
| Form W-2C | Download Excel Template |
Issuer Import Template
| Form | Template |
|---|---|
| Import Issuers List | Download Excel Template |
Saving / Editing a File
Save a file, re-open a saved file, or delete a saved file.
How to Save a File
- Select the orange File menu.
- Click Save File from the dropdown options.
- In the File Name Save dialog window, type the desired name into the File Name text field.
- Select the blue Save button to save the file.
How to Re-Open a Saved File
- In the top toolbar, click the orange File menu.
- Click Open (My Files).
- In the file(s) list, locate the desired file.
- Click the folder icon at the left of the file name.
- The selected file will load onto the workspace.
How to Delete a Saved File
- Select the File menu and select Open (My Files) option from the dropdown.
- Find the file intended for deletion in the table list.
- Under the Actions column on the left of the file name, click the "X" (delete) button corresponding to the file.
- A window will appear asking "Are you sure you want to delete file?", click OK to permanently remove the file.
Service Bureau
Move files to your cart, check out, and purchase programs from the Product Store.
How to Add a Single File to Cart
- Once a file has been saved, it can be added to the cart by selecting Service Bureau from the top menu.
- Select Send (Move to Cart).
- Once a file is added to cart, a window will prompt to either “Continue to Checkout” or “Take me back to my files.”
- Select the Continue to Checkout option after adding a file to cart.
- Once in the Send File(s) window, select the File Purpose using the dropdown list.
- After selecting from one of the service options, review the payment details, enter a valid phone number and select a payment method.
- Click the blue Checkout button to proceed to payment.
- A window will prompt to verify order payment:
- Check the box to the bottom left to “Agree to the Terms and Conditions.”
- Click the blue Pay Now button.
- Proceed to enter all required payment information.
Note: Please be sure to review file(s) before moving to cart and proceeding with payment.
How to Add Multiple Files to Cart
- From the File menu, select the option Open (My Files).
- Locate the files to be moved and select the Cart button found at the left of the file name.
- The cart button should disappear, and it should be displayed in the In Cart column.
- Once all required files are moved, close the My Files window and Navigate to the Service Bureau then select View Cart.
- In the Send File(s) window, select the File Purpose using the dropdown list.
- After selecting from one of the service options, review the payment details, enter a valid phone number and select a payment method.
- Click the blue Checkout button to proceed to payment.
- A window will prompt to verify order payment:
- Check the box to the bottom left to “Agree to the Terms and Conditions.”
- Click the blue Pay Now button.
- Proceed to enter all required payment information.
Note: Please be sure to review file(s) before moving to cart and proceeding with payment.
How to Checkout
- Select the Continue to Checkout option after adding a file to cart, or use the Service Bureau menu and select View Cart.
- Once in the Send File(s) window, select the File Purpose using the dropdown list.
- After selecting one of the service options, review the payment details and select a payment method.
- Click the blue Checkout button to proceed to payment.
- A window will prompt to verify order payment:
- Check the box at the bottom left to Agree to the Terms and Conditions.
- Click the blue Pay Now button.
- Enter all required payment information.
- Note: Please review file(s) before moving to cart and proceeding to payment.
How to Purchase a Program from the Product Store
To purchase a program, open the orange Service Bureau menu at the top of the grid and select Product Store.
On the product page, select the desired program and the required number of user licenses.
Printing
Print individual recipient forms or save your forms as a PDF.
How to Print an Individual Recipient Form
- Open the required file.
- To open a specific file, select File > Open (My Files).
- Locate the recipient in the grid and select the Print button to the left of the recipient’s name.
- A Print Form window will appear select the following:
- Unmask (not recommended) or Mask Recipient’s TIN (Tax Identification Number)
- Select Copy Type (Copy B, Copy C, Copy 1, etc.)
- After making the required selections, click the blue Print button at the bottom of the window.
- A preview of the form will open. Review the form and select the Printer icon at the top right of the preview window.
- Use the local print controller to choose a physical printer or Save as a PDF.
Corrections
This guide provides step-by-step instructions and references for processing, reviewing, and submitting correction/amendments. More information coming soon…
About Form W-2
General Instructions & Compliance Requirements
- Filing Mandates: Employers must issue a Form W-2 to any employee paid $600 or more during the tax year, or to any employee who had taxes withheld regardless of total pay.
- Deadlines: Copies must be provided to both the employee and the Social Security Administration (SSA) by January 31 following the end of the tax year.
Critical Highlighted Fields on Form W-2
Identifier & Demographic Information
- Box a (Employee Social Security Number): Must match the employee's official Social Security card to ensure proper credit toward retirement benefits.
- Box b & c (Employer Identification Number & Address): Reports the official federal EIN and legal business mailing location.
- Box d (Control Number): An optional internal tracking/identification number assigned by employer payroll software. If unused, it can be left blank.
- Box e & f (Employee Name & Address): Must feature the full legal name split strictly by first name, middle initial, last name, and suffix.
Wage & Federal Tax Breakdown
- Box 1 (Wages, Tips, Other Compensation): Total taxable wages subject to federal income tax. (Note: Pre-tax deductions like traditional 401(k)s or Section 125 HSA contributions reduce this total.)
- Box 2 (Federal Income Tax Withheld): Total federal tax withheld from wages over the calendar year.
- Box 3 (Social Security Wages): Total earnings subject to Social Security tax, capped at the annual wage base limit.
- Box 4 (Social Security Tax Withheld): Total Social Security tax withheld (calculated as 6.2% of Social Security wages up to the cap).
- Box 5 (Medicare Wages & Tips): Earnings subject to Medicare tax (unlike Box 3, there is no wage base cap).
- Box 6 (Medicare Tax Withheld): Total regular Medicare tax (1.45%) plus any applicable Additional Medicare Tax (0.9%) withheld.
- Box 7 (Social Security Tips): Cash or allocated tips reported by the employee to the employer that are subject to Social Security tax. Combined with Box 3, this amount cannot exceed the annual wage base limit.
- Box 8 (Allocated Tips): Tips allocated by a large food or beverage establishment to the employee. Note: These tips are not included in Box 1, Box 3, Box 5, or Box 7.
Special Tax Reporting & Benefits
- Box 10 (Dependent Care Benefits): Reports total daycare reimbursements or pretax flexible spending dollars provided under a dependent care FSA.
- Box 11 (Nonqualified Plans): Reports distributions paid to the employee from a nonqualified deferred compensation plan or a nongovernmental Section 457(b) plan. Indicates whether any amount in Box 1 includes prior-year deferred compensation.
- Box 12 (Codes): Uses single- or multi-letter codes to categorize specific benefits and non-wage compensation. Key entries include:
- Code D: Pre-tax elective deferrals to a 401(k).
- Code W: Employer plus employee contributions to a Health Savings Account (HSA).
- Code DD: Cost of employer-sponsored health coverage (informational only).
- Code AA/BB: Roth contributions to retirement plans.
- Box 13 (Checkboxes): Indicates whether the worker is a Statutory Employee, participated in an active Retirement Plan, or received Third-Party Sick Pay.
- Box 14a (Other): Captures general non-standard payroll deductions and informational benefits. Examples include state disability insurance (SDI) withheld, union dues, health insurance premiums, educational assistance, or voluntary charitable contributions.
- Box 14b (Treasury Tipped Occupation Code(s)): New structural requirement for tipped industries. If cash tips are reported using Code TP in Box 12, the official 3-digit Treasury Tipped Occupation Code(s) must be entered here (up to two codes).
State & Local Taxes
- Boxes 15–20: Captures state- and local-level tax withholdings, state employer registration numbers, and specific local wage thresholds based on the employee's work and resident locations.
W-2C (Corrections)
Correct any errors on a previously issued Form W-2 by submitting Form W-2c (Corrected Wage and Tax Statement).
Filing Timeframe Limits (SSA Restrictions)
- Form W-2: The Social Security Administration (SSA) accepts original W-2 filings for the current tax year and up to three prior years.
- Form W-2c:
- Before April 15: The SSA accepts W-2c corrections for the current tax year and up to four prior years.
- After April 15: The cutoff shifts. The SSA accepts corrections for the current tax year and up to three prior years only.
For Further Instructions on Form W2 - C, please follow the link provided: 2026 General Instructions for Forms W-2 and W-3
About Form 1042 Annual Return
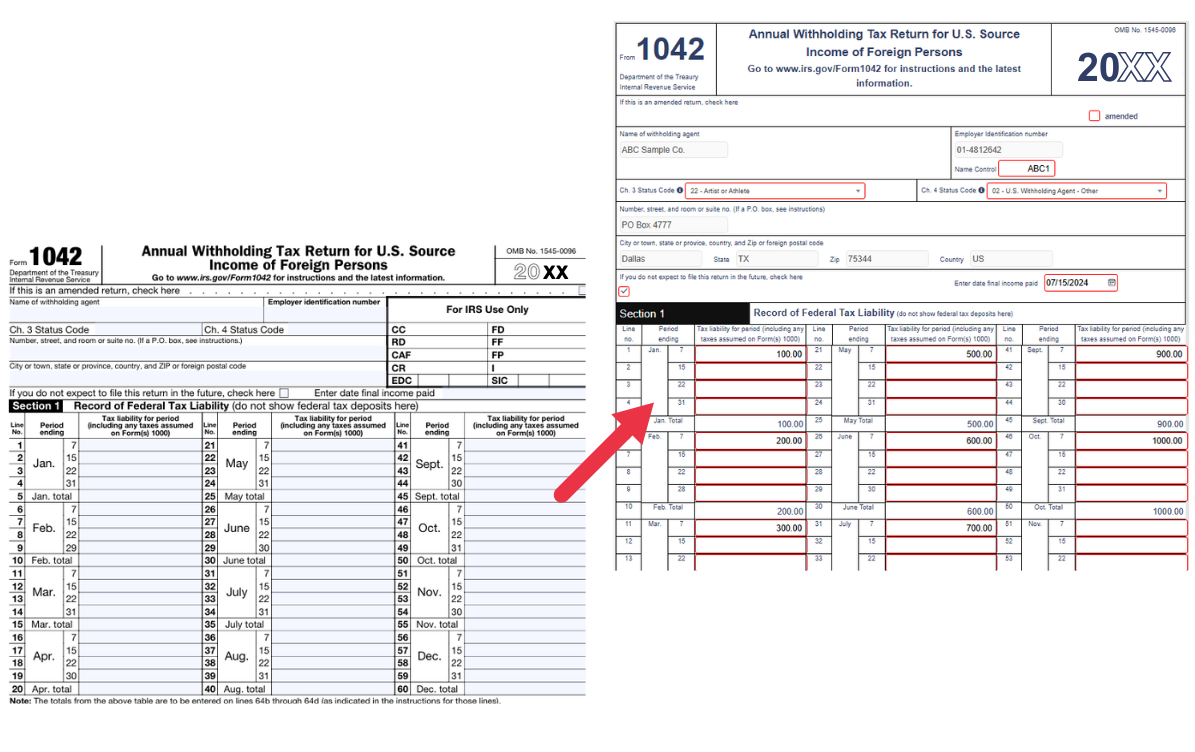
Rounding Off to Whole Dollars
The 1042Express program rounds off the values to whole dollars when generating the IRS file to e-file. Mailed forms may include cents so that proper reconciliation may take place.
To round off amounts to the nearest dollar, drop amounts under 50 cents and increase amounts from 50 to 99 cents to the next dollar.
* For example: $1.39 becomes $1 and $2.50 becomes $3. If you must add two or more amounts to figure the amount to enter on a line, include cents when adding and only round off the total.
Employer identification number (EIN)
You are required to enter your EIN. If you are filing Form 1042 as a QI, WP, or WT, enter your QI-EIN, WP-EIN, or WT-EIN.
If you are a QSL that is also a QI, enter your QI-EIN. Otherwise, enter the EIN you have been assigned.
If you are, for chapter 4 purposes, a PFFI or other financial institution that has been issued a global intermediary identification number (GIIN) for chapter 4 reporting purposes, you must nevertheless get an EIN to file Form 1042 (or use your existing EIN, such as a QI-EIN in the case of a QI if filing in such capacity).
If you are a PFFI or other financial institution filing this form on behalf of a branch other than your U.S. branch, you cannot use the EIN of the U.S. branch to file this form and you must get a separate EIN to file this form on behalf of all your branches other than your U.S. branch.

Chapter Codes and Addresses
Chapter 3 and 4 Status Codes of Withholding Agent
Enter your chapter 3 and chapter 4 status codes from the list of “Type of Recipient, Withholding Agent, Payer, or Intermediary Code” on Form 1042-S.
You must enter both a chapter 3 and a chapter 4 withholding agent status code regardless of the type of payment being made.

Address
Include the suite, room, or other unit number after the street address.
If your post office does not deliver mail to the street address and you have a P.O. box, show the box number instead of the street address.

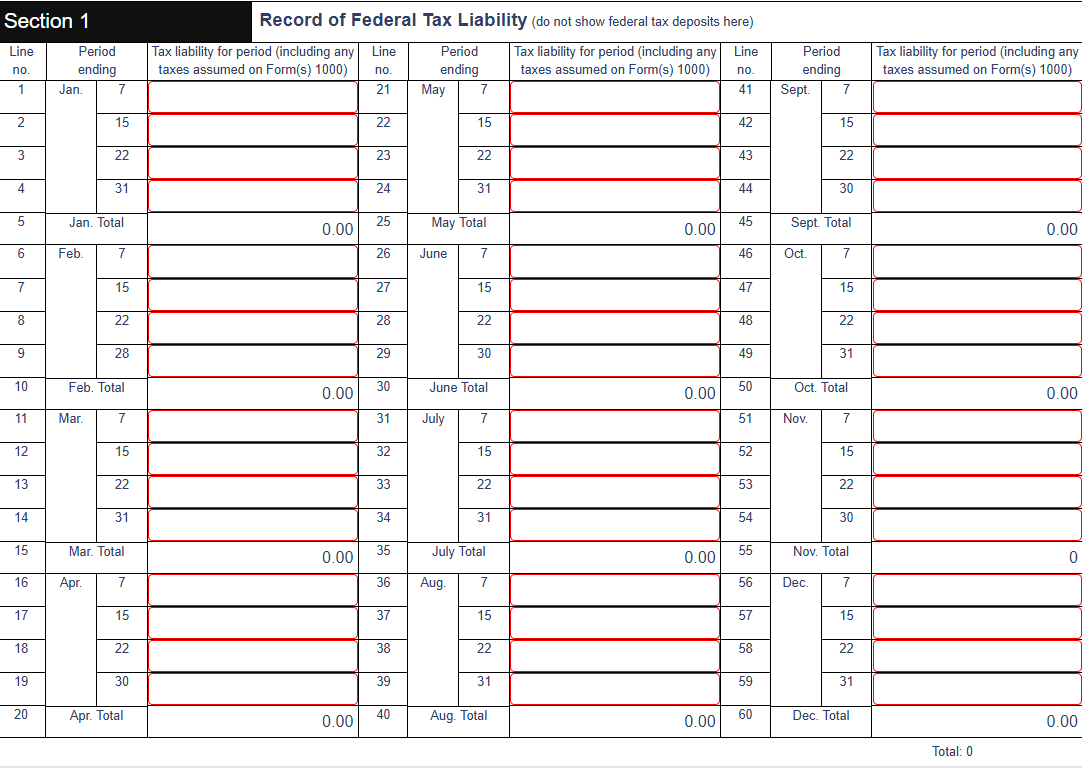
Section 1. Record of Federal Tax Liability
Lines 1 through 60
Except as otherwise provided in these instructions, include the tax liability for the period in which the income was paid or distributed regardless of whether the liability is under chapter 3 or chapter 4 and regardless of whether the liability was satisfied through withholding or was paid by the withholding agent (see the instructions for box 11 of Form 1042-S).
Do not enter any negative amounts on these lines. If you are required to report a reduction to liability on line 59 (because you made a repayment under the reimbursement or set-off procedure), and this results in a negative amount of tax liability for the period corresponding to line 59, you should instead report any negative amount for the next earlier period(s) so that you are not reporting any negative amounts on lines 1 through 60.
Line 61
Enter the number of Forms 1042-S filed on paper and electronically.

Total Gross Amounts Reported
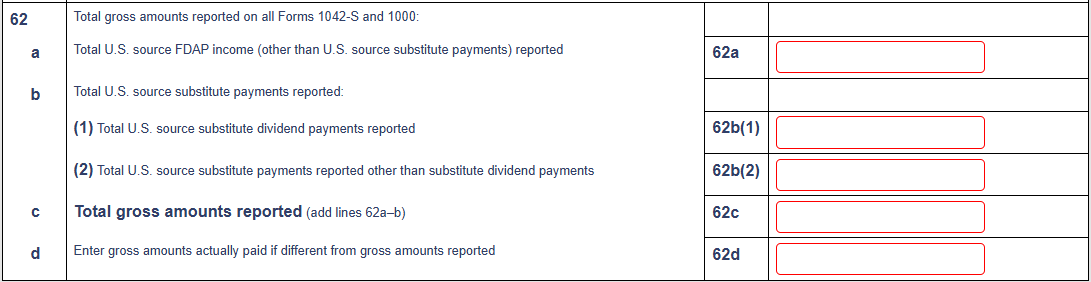
Lines 62a through 62c
Enter the amounts reported on all Forms 1042-S for the calendar year (regardless of whether the form was filed electronically or on paper) and for all Forms 1000, Ownership Certificate.
Line 62a
The amount on line 62a should equal the sum of all amounts shown in box 2 of Form 1042-S that are payments of U.S. source Fixed, Determinable, Annual, or Periodical (FDAP) income,
less the sum of all amounts that are U.S. source substitute payments reported on line 62b.
Line 62b
The amount on:
- Line 62b(1) should equal the sum of all amounts shown in box 2 of Form 1042-S that are U.S. source substitute dividend payments; and-
- The amount shown on line 62b(2) should equal all amounts shown in box 2 of Form 1042-S that are U.S. source substitute payments other than substitute dividend payments.
☆ See Regulations section 1.1441-2(b)(4) regarding substitute payments.
Line 62c
The amount on line 62c should equal the sum of all amounts of U.S. source FDAP income shown in box 2 of Form 1042-S and all amounts shown as gross interest paid on Forms 1000.
Line 62d
Enter gross amounts of U.S. source FDAP income reportable on Forms 1000 and Forms 1042-S if different from the total gross amounts actually reported on Forms 1000 and Forms 1042-S (as shown on line 62c).
Total Tax Reported as Withheld or Paid
Lines 63a through 63e
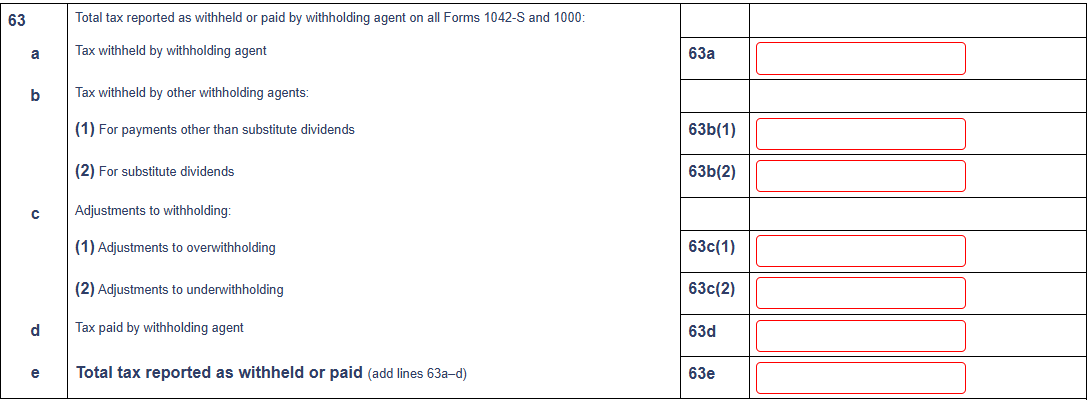
Except as noted directly below, enter for each line the amounts reported for all Forms 1042-S (regardless of whether the form was filed electronically or on paper) and for all Forms 1000.
Line 63a
The amounts reported on line 63a should be the amounts actually withheld by the withholding agent before any applicable adjustments reported on lines 63c(1) and 63c(2).
Line 63c(1)
The amounts reported on line 63c(1) should be amounts you repaid to the beneficial owner or payee in the year following the calendar year of overwithholding pursuant to either the reimbursement or set-off procedures (and should also be reported as a reduction in tax liability on line 59).
☛ See Adjustment for Overwithholding , later. The total of the amounts reported on line 63c(1) should equal the sum of all amounts reported in box 9 of the corresponding Forms 1042-S.
Line 63c(2)
The amounts reported on line 63c(2) should be amounts that you withheld in the year following the calendar year of underwithholding from future payments made to a beneficial owner or from other property or additional contributions of a beneficial owner that you hold in custody or otherwise control.
☛ See Adjustment for Underwithholding, later. Also report on line 63c(2) any other amounts that you withheld in the year following the calendar year in which the related payments were made (to the extent permitted under an applicable regulation section in chapter 3 or 4).
☛ See Withholding after the time of payment, earlier, for how to report the tax liability related to such payments.
☰ Note:
The total of the amounts reported on lines 63a and 63c(2) should equal the sum of all amounts withheld by the withholding agent and reported in box 7a of the corresponding Forms 1042-S.
☰ Note:
The total of the amounts reported on lines 63b(1) and 63b(2) should equal the sum of all amounts reported in box 8 of all Forms 1042-S sent to recipients.
Line 63d
The amounts reported on line 63d should be the amounts paid by the withholding agent from its own funds rather than through withholding from the payment to the recipient.
The amount on line 63d should equal the sum of all amounts reported in box 11 of all Forms 1042-S sent to recipients.
Total Net Tax Liability
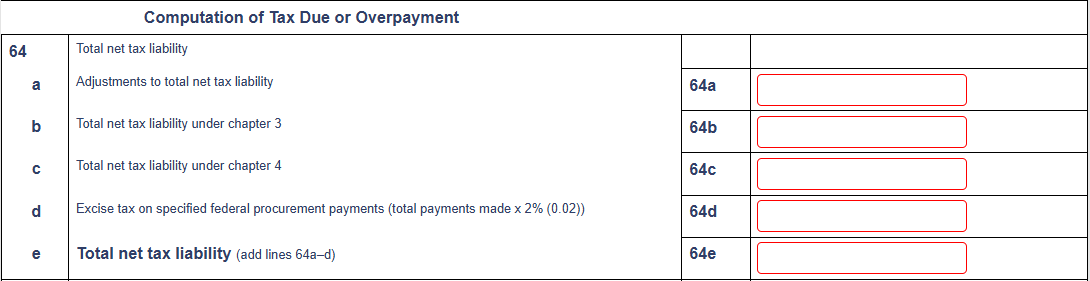
Line 64a
Include on line 64a any adjustments to total net tax liability. For example, report any adjustment to liability when:
- A distributing corporation made a reasonable estimate of accumulated and current earnings and profits under Regulations section 1.1441-3(c)(2)(ii)(A) or 1.1474-6(c)(2)(ii); and
- A distributing corporation or intermediary paid over any underwithheld tax with respect to the distribution by March 17, 2025.
☰ Note:
The amount reported on line 64a must not be included in the Record of Federal Tax Liability (lines 1 through 60).
Lines 64b and 64c
Enter the sum of the amounts reported on the Record of Federal Tax Liability (that is, the sum of lines 5, 10, 15, 20, 25, 30, 35, 40, 45, 50, 55, and 60)
that are attributable to liability under chapter 3 (on line 64b) and chapter 4 (on line 64c).
The amounts shown on lines 64b and 64c should not include any amounts shown on lines 64a and 64d.
Do not make any other adjustments to this line.
Line 64d
Enter on line 64d amounts reported on the Record of Federal Tax Liability that are attributable to liability for specified federal procurement payments under section 5000C.
Line 64e
The amount on line 64e should equal the sum of lines 64a through 64d.
Reporting of Taxes Paid and Overpayment or Balance Due
Line 65
Enter the total tax deposits you made for the year (including amounts paid with an extension of time to file). Enter deposits of tax withheld during the calendar year in which the related payment was made on line 65a. Enter deposits of tax withheld during the year following the calendar year in which the related payment was made (to the extent permitted under an applicable regulation section in chapter 3 or 4) on line 65b.
See Withholding and reporting in a subsequent year, earlier.

Line 66
Enter any overpayment reported on the 2023 Form 1042 that you are applying as a credit on the 2024 Form 1042.
See line 71, later.

Line 67a and 67b
You are permitted to take a credit for amounts withheld by other withholding agents that relate to the total net tax liability reported on lines 64b and 64c.
For example, you are a QI and the amount you entered on line 64b includes amounts withheld by a U.S. withholding agent under chapter 3 with respect to payments made to you as an intermediary on behalf of your account holders.
You may take a credit on line 67 for the amounts that were withheld by the U.S. withholding agent. The amount on line 67 should equal the sum of all Forms 1042-S, box 8, that you file for the year.
☰ Note:
All withholding agents (including QIs, WPs, WTs, NQIs, NWPs, and NWTs) must substantiate entries on lines 67a and 67b by attaching a supporting
Form(s) 1042-S or 1099 to verify the credit amounts claimed for withholding by other withholding agents. Failure to do so will result in the denial
of the refund or credit being claimed. If you are a PTP or a nominee withholding under section 1446, the tax paid for a payee may only be claimed
as a credit by the payee.

Line 68
Total payments. ( The total sum of lines 65 through 68. )

Line 69
If line 64e is more than line 68, enter balance due here.
( If line 64e is greater than line 68, enter the total difference of line 64e and line 68. )

Lines 70a and 70b
Enter on line 70a any overpayment attributable to payments subject to withholding under chapters 3 and 4. Enter on line 70b any overpayment attributable to payments subject to the excise tax on specified federal procurement payments.
Do not include on these lines any overpayment attributable to amounts that were actually withheld from the beneficial owner (unless such amounts were repaid pursuant to the reimbursement or set-off procedures).

Line 71
You may claim an overpayment (the sum of lines 70a and 70b) as a refund or a credit. Check the applicable box on line 71 to show which one you are claiming. If you claim a credit, it can reduce your required deposits of withheld tax for 2025.
*Note that if you repaid the recipient overwithheld amounts after year-end 2024 using the reimbursement or set-off procedures, you are not able to claim a refund for such an amount on the 2024 Form 1042.
Instead, you must indicate on line 71 that you are claiming a credit to be applied to the 2025 calendar year.

Name Controls
What is a Name Control?
A name control is a sequence of characters derived from a taxpayer's name that is used by IRS in processing the tax return filed by the taxpayer.
It is important that the combination of name control and taxpayer identification number (TIN) provided on an electronically filed return match IRS's record of name controls and TINs.
A name control is established by the IRS when the taxpayer requests an Employer Identification Number (EIN).
The IRS creates the name control from the legal name listed on the Form SS-4, Application for Employer Identification Number.
When a return or extension is filed, the IRS checks whether a name/TIN combination is correct by matching it against a file containing all employer identification numbers (EIN) issued by IRS.
The name control listed on the return/extension is then compared to the name control on the IRS file. If it matches the name control in our records, it is considered to be correct.
The Name Control is assigned by the IRS when the EIN is initially generated and given to the entity. It is usually the first 4 characters in the company name. Please refer to your original documents for clarification.
For More Information on Name Controls Visit ⇒ Using the correct name control in e-filing corporate tax returns
Self Selected PIN
What is a Self-select PIN?
The PIN is any five numbers (except all zeros) the taxpayer chooses to enter as their electronic signature. Taxpayers are required to use a PIN when they file an electronic tax return using an Electronic Return Originator (ERO) or commercial-off-the-shelf (COTS) tax preparation software.
For More Information on Self-Selected PIN, Visit ⇒ Self-select PIN method for Forms 1040 and 4868 Modernized e-File (MeF)
Federal Form Instructions
Official IRS instructions for every form 1099Express supports, with links to IRS.gov. View Federal Form Instructions →