Also see:
 Example
Print Setups for legal, letter and pressure seal forms.
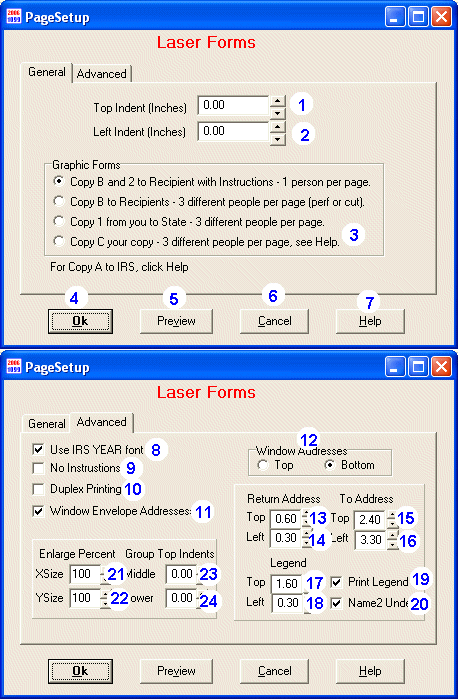
Items 1 and 2:
When the Indents are set to zero, the top and left margins are one-half inch.
Example
Print Setups for legal, letter and pressure seal forms.
Items 1 and 2:
When the Indents are set to zero, the top and left margins are one-half inch.
To move the printing down on the paper, increase the top indent.
To move the printing up on the paper, decrease the top indent (make it negative).
To move the printing right on the paper, increase the left indent.
To move the printing left on the paper, decrease the left indent (make it negative).
If the print output is cut off at the bottom of a page, correct this by moving the print up. For example, change the Top Indent to -0.10 inches (minus a tenth of an inch). Also, you can increase the "Printable Area" in your printer's driver setup, to give more printable area on the bottom or top of your laser page. If you increase the printable area, reset the indents to zero.
Indents are set in inches. For example, if the top indent is 0.20, the form is moved down two-tenths of an inch. Changing the TOP indent, moves the entire printed information up or down, which can help line up for window envelopes. Changing the LEFT indent moves the graphical form either left or right for centering on your printer. This applies for pre-printed forms as well as laser generated forms.
Item
3: Select the
appropriate copy to print.
Item 4: Click OK to begin printing.
Item 5: Click to Preview the printout. To print, close this window and start
over.
Item 6: Click to Cancel printing.
Item 7: Click to display Help for printing.
Item 8: If checked displays IRS style year font, else a normal font.
Item 9: If checked, no instructions are printed on the front or back of
the form. Check this box if instructions are already present. See
instructions to recipients.
Item 10: Checking Duplex Printing causes 1099Express to print
instructions of the back of the page if the printer is duplex capable. See
instructions to recipients.
Item 11: Check Window Envelope Addresses to print "mailing labels" type
addresses on the same page with the 1099Express laser forms.
Item 12: Check "Top" to print the "mailing labels" on the top 1/3rd of the page,
or "Bottom" to print on the bottom 1/3rd of the letter size page.
Item 13 and 14: Moves Return Address anywhere to match window envelopes
and works like items 1 and 2. See recipient
copies.
Item 15 and 16: Moves To Address anywhere to match window envelopes and works
like items 1 and 2. See
recipient copies.
Items 17 and 18: Moves the legend IMPORTANT TAX RETURN DOCUMENT ENCLOSED
any where (to show through the upper or lower window). This legend is required
by IRS regulations. See
recipient copies.
Item 19: the legend IMPORTANT TAX RETURN DOCUMENT ENCLOSED is printed
only when this box is checked.
Item 20: If this box is checked, the second name line is printed under the first
name line. Otherwise the second name line is added to the right of the first
name line.
Item 21 and 22: XSize Enlarges or Reduces (scales vertically) all printed
information on a page including forms and instructions. The default is 100
percent. For example, if XSize is set to 95 percent, the forms would be 5
percent shorter (further from the bottom margin), but the same width. Similarly,
YSize scales horizontally. For example, if YSize is set to 95 percent, the forms
would be 5 percent narrower (further from the right margin).
Item 23: Middle Third Top Indent: Default is 0. Units are inches. Works
like item 1, "Top Indent". Larger moves the middle 1/3rd of the page down.
Smaller (negative) moves the middle 1/3rd of the page up. Middle Indent is
designed to move the top and middle parts closer together for applications such
as pressure seal forms.
Item 24: Lower Third Top Indent: Default is 0. Units are inches. Works
like item 1, "Top Indent". Larger moves the lower 1/3rd of the page down.
Smaller (negative) moves the lower 1/3rd of the page up. Lower Indent is
designed for general flexibility.
Main Print Topic