Building the IRS file converts the SOURCE (.src) file to a file in IRS format for e-Filing.
| Begin by opening the source (.src) file created in the 1099Express program. |
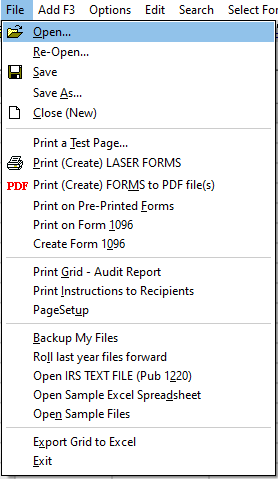
| Select the File menu and Open (or Re-Open) from the drop-down list to locate the file needed and populated into the 1099Express program.
|
 |
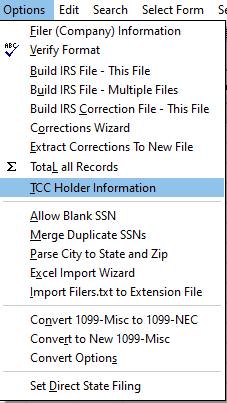
| Once the file is opened, select the Options menu and select the TCC Holder Information from the drop-down list. |
 |
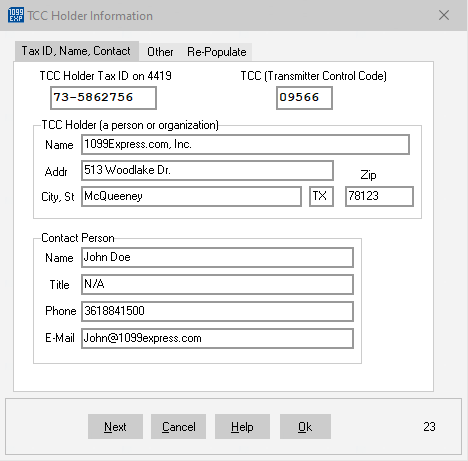
Complete the required information and enter the Transmitter Control Code required for filing on the IRS FIRE site.
- After entering all required TCC information, click Ok.
|
 |
| Save the file after entering the TCC information by selecting the File menu and Save. |
 |
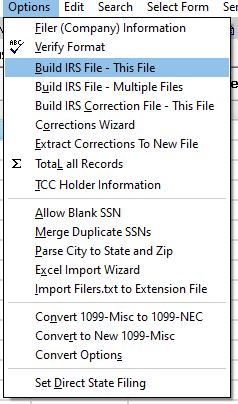
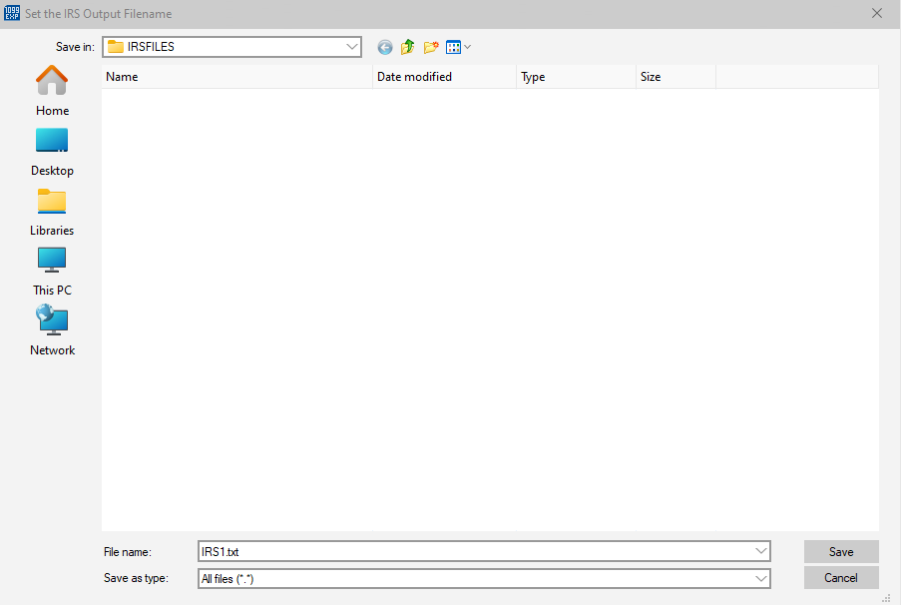
After the file is saved. Select the Options menu and click Build IRS File - This File.
- Use the suggested filename "IRS1.txt".

- If this is the second IRS file created, use the name "IRS2.txt".
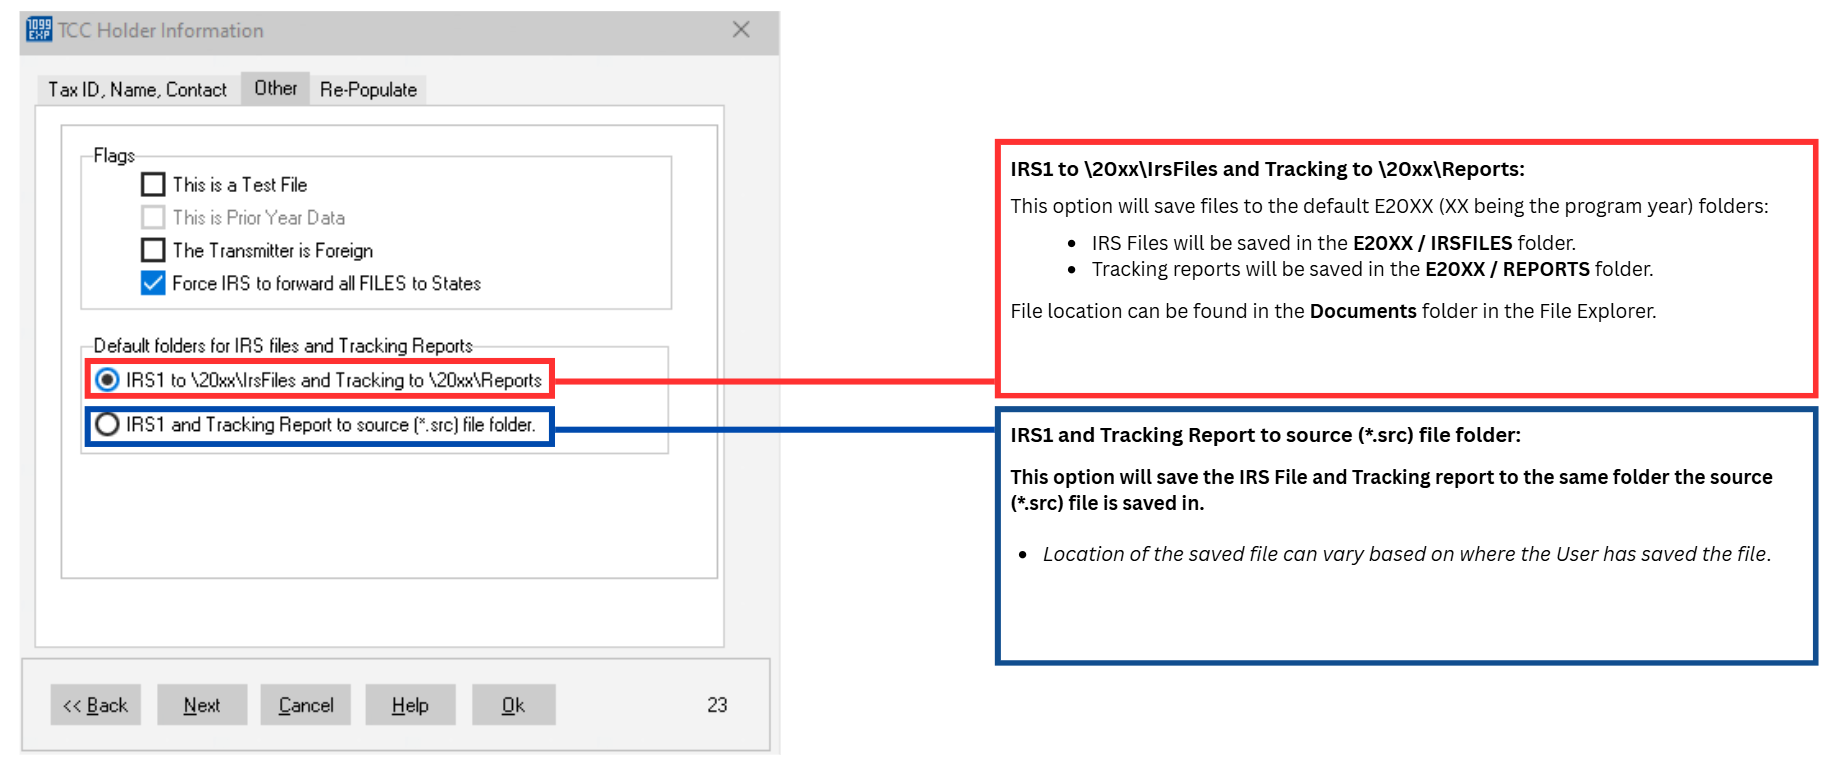
- The IRS1.txt file(s) will be saved in a default folder called E20XX - IRSFILES, unless the location was changed in the TCC Holder Information window.
|
 |
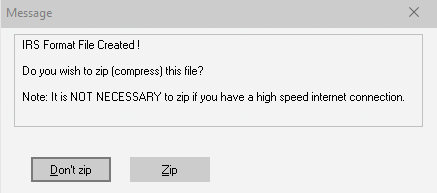
Once the IRS1.txt file is created, a window will open asking if the file will need to be compressed into a Zip File.
- It is not reccomended to compress the file to a Zip file, however (if internet speeds are slow), zipping the file would help with the future upload.
- This creates another file with the '.zip' extension.
- Please note: Send the 'IRS1.txt' or 'IRS1-txt.zip' but never both.
|
 |
Print the Tracking Report.
- After creating the IRS1.txt file, a text box will appear displaying the information about that file. This is the tracking report.
- Be sure to print the tracking information, then click Close to continue.
|
 |
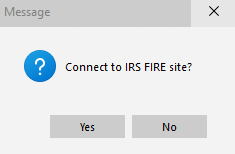
Uploading the IRS1.txt file.
- Once the Text Viewer is closed, a window will populate that can re-direct the user to the FIRE.IRS.gov website.
- Users can select Yes to be re-directed to the IRS FIRE site to submit the IRS1.txt file.
- If the user has an existing account, select Log On.
- If an account has not been made previously, 'Create New Account'. Follow the instructions provided and fill out all neccassary information.
|
 |
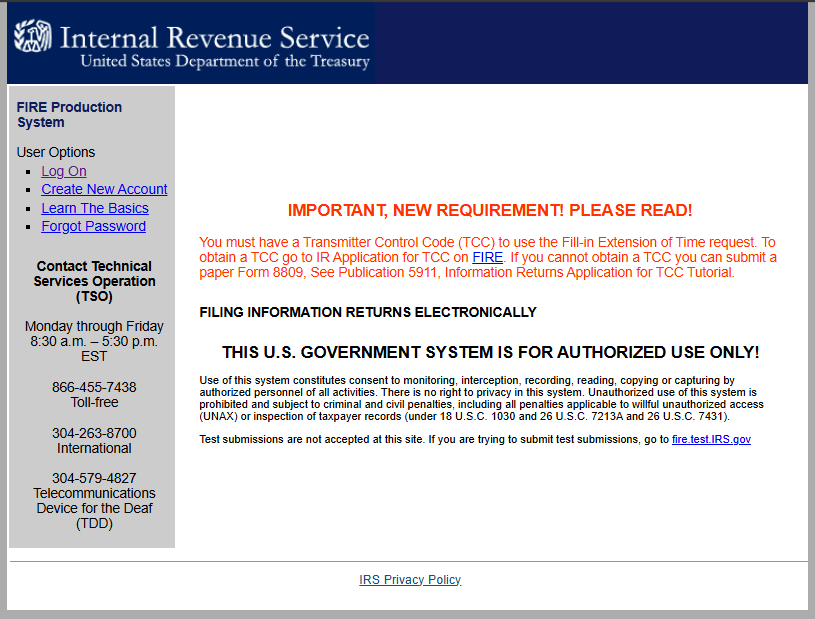
Log into the IRS Fire site and select the option 'Send Information Returns'. Follow the prompts provided (entering your TCC, TIN, VERIFY, PIN, etc.) when requested.
- When prompted for FILE TYPE choose Original, if this is the first time uploading a file. Other file types could be Replacement, Test, or Correction.
- Continue until the screen that has the BROWSE or UPLOAD option appears.
- Click the BROWSE button. A 'Choose File' window will appear. Navigate to the Documents/1099Express/E20XX then select the IRSFILES folder.
- The top window labeled "LOOK IN" should be set to Documents/1099Express/E20XX/IRSFILES.
- Click the file needed to e-File (such as the IRS1.txt), then select OPEN.
- Next click the UPLOAD button.
- An "Upload Progress" window will then appear as the file uploads to the IRS.
- After a successful upload, users will be directed to the 'File Upload Statistics' web page.
- This page will show the "Total Bytes Received", which is required to be printed.
- Please be sure to not submit a .SRC file as it will be rejected upon upload.
|
 |
1099 Express can combine multiple source files (.src files) into a single IRS compatible file,
even if the source files are different form types (Dividends, Interest, Misc, etc.), and even
if the source files are from different Companies, BUT not different years or if there are
corrections present.
Source files may reside in any folder or multiple folders.
Typically, source files are found in the E20XX Folder (XX representing the program's year) ,
but may be saved in any folder the user chooses.
Be sure to notate the location the .SRC (source) files are saved before building a multi-file.
|
Begin by closing any file(s) opened in the program currently.
It is important that the grid is blank to create an IRS multi-file.
|
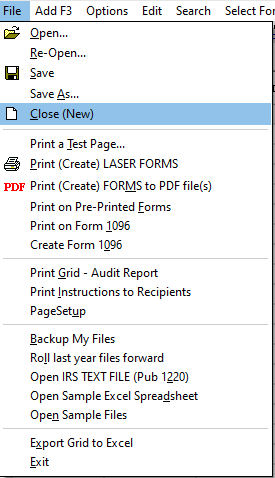
| A file can be closed by selecting the File menu and selecting the Close (New)
option from the drop-down list. |
 |
Once the grid is cleared of any data, select the Options menu and from the drop down list select
TCC Holder Information.
- Alternativly, users can select the Transmitter button found on the bottom left of the program.

|
|
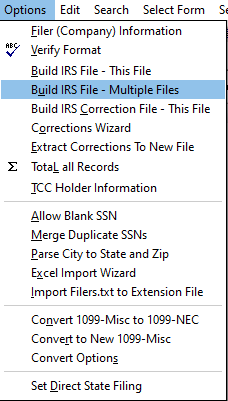
After entering the TCC Information, select the Options menu and select Build IRS File - Multiple Files.
- It is important to remember the location the .SRC file(s) are saved.
- To verify the file location before building an IRS multi-file, select the File
menu and from the drop-down list select Re-Open...
- A window with a list of past files will populate. It will list the location each file is saved in.
Only one TCC may be used for a multiple build, regardless of how many source files are
combined and regardless of how many Companies (Filers) are present.
The first source file (in the lower list box) must have the complete TCC holder Information.
Only the TCC Information from the first file is sent to the IRS.
The TCC Holder Information
in other files is ignored.
All source files must have complete Issuer(Filer) Information.
Each file must also have the Account number fields populated.
Account numbers can be populated automatically by clicking the Edit menu then
"Insert Account Numbers".
|
 |
A new window will populate.
- (1) The right "Select Input Folder" will be the folder the file is saved in.
- (2) The left "Select File: double-click to add to List" is the files saved in the selected folder.
- (3) If the user saved files outside the default drive, us the Select Drive drop-down list.
- (4) The largest window on the bottom will list the selected file(s) in red. Be sure to always double-check the data in this list before selecting OK.
|
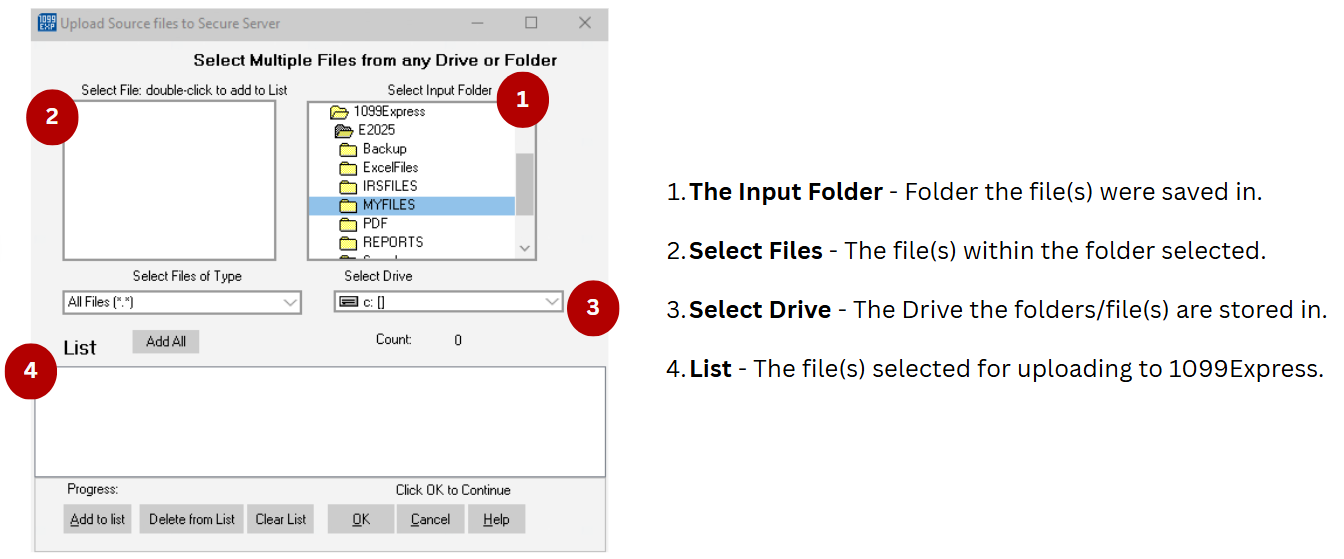 |
| After checking the red list to verify all files needed, click Ok to proceed. |
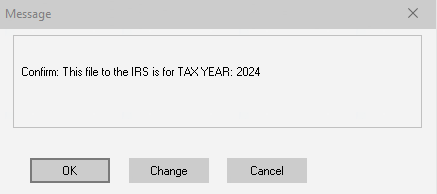
A new window will populate asking the user to check the tax year.
- If the tax year is correct click OK to proceed.
- If the tax year is incorrect click the Change button to edit the tax year.
|
 |
Users will be re-directed to save the IRS multi-file.
- Use the suggested filename "IRS1.txt".
- If this is the second IRS file created, use the name "IRS2.txt".
- The IRS1.txt file(s) will be saved in a default folder called E20XX - IRSFILES, unless the location was changed in the TCC Holder Information window.
|
 |
Print the Tracking Report.
- After creating the IRS1.txt file, a text box will appear displaying the information about that file. This is the tracking report.
- Be sure to print the tracking information, then click Close to continue.
|
|
Uploading the IRS1.txt file.
- Once the Text Viewer is closed, a window will populate that can re-direct the user to the FIRE.IRS.gov website.
- Users can select Yes to be re-directed to the IRS FIRE site to submit the IRS1.txt file.
- If the user has an existing account, select Log On.
- If an account has not been made previously, 'Create New Account'. Follow the instructions provided and fill out all neccassary information.
|
|
Log into the IRS Fire site and select the option 'Send Information Returns'. Follow the prompts provided (entering your TCC, TIN, VERIFY, PIN, etc.) when requested.
- When prompted for FILE TYPE choose Original, if this is the first time uploading a file. Other file types could be Replacement, Test, or Correction.
- Continue until the screen that has the BROWSE or UPLOAD option appears.
- Click the BROWSE button. A 'Choose File' window will appear. Navigate to the Documents/1099Express/E20XX then select the IRSFILES folder.
- The top window labeled "LOOK IN" should be set to Documents/1099Express/E20XX/IRSFILES.
- Click the file needed to e-File (such as the IRS1.txt), then select OPEN.
- Next click the UPLOAD button.
- An "Upload Progress" window will then appear as the file uploads to the IRS.
- After a successful upload, users will be directed to the 'File Upload Statistics' web page.
- This page will show the "Total Bytes Received", which is required to be printed.
- Please be sure to not submit a .SRC file as it will be rejected upon upload.
|
|