Creating a Correction File
For instructions on creating a Correction File, please read below:
In order to create a correction file, the Issuer must identify the type of correction that is needed.
Details on types of corrections please proceed here: Types of Corrections
*Please be advised: Never change your original source file after is has been successfully filed to the IRS. Keep and preserve all information, including all errors discovered after filing.
If a correction is needed, the Issuer must creat a new file containing only the corrections (and any recipients that were missed previously)
A Type-1 Correction will require only one form to complete the correction.
STEP 1:
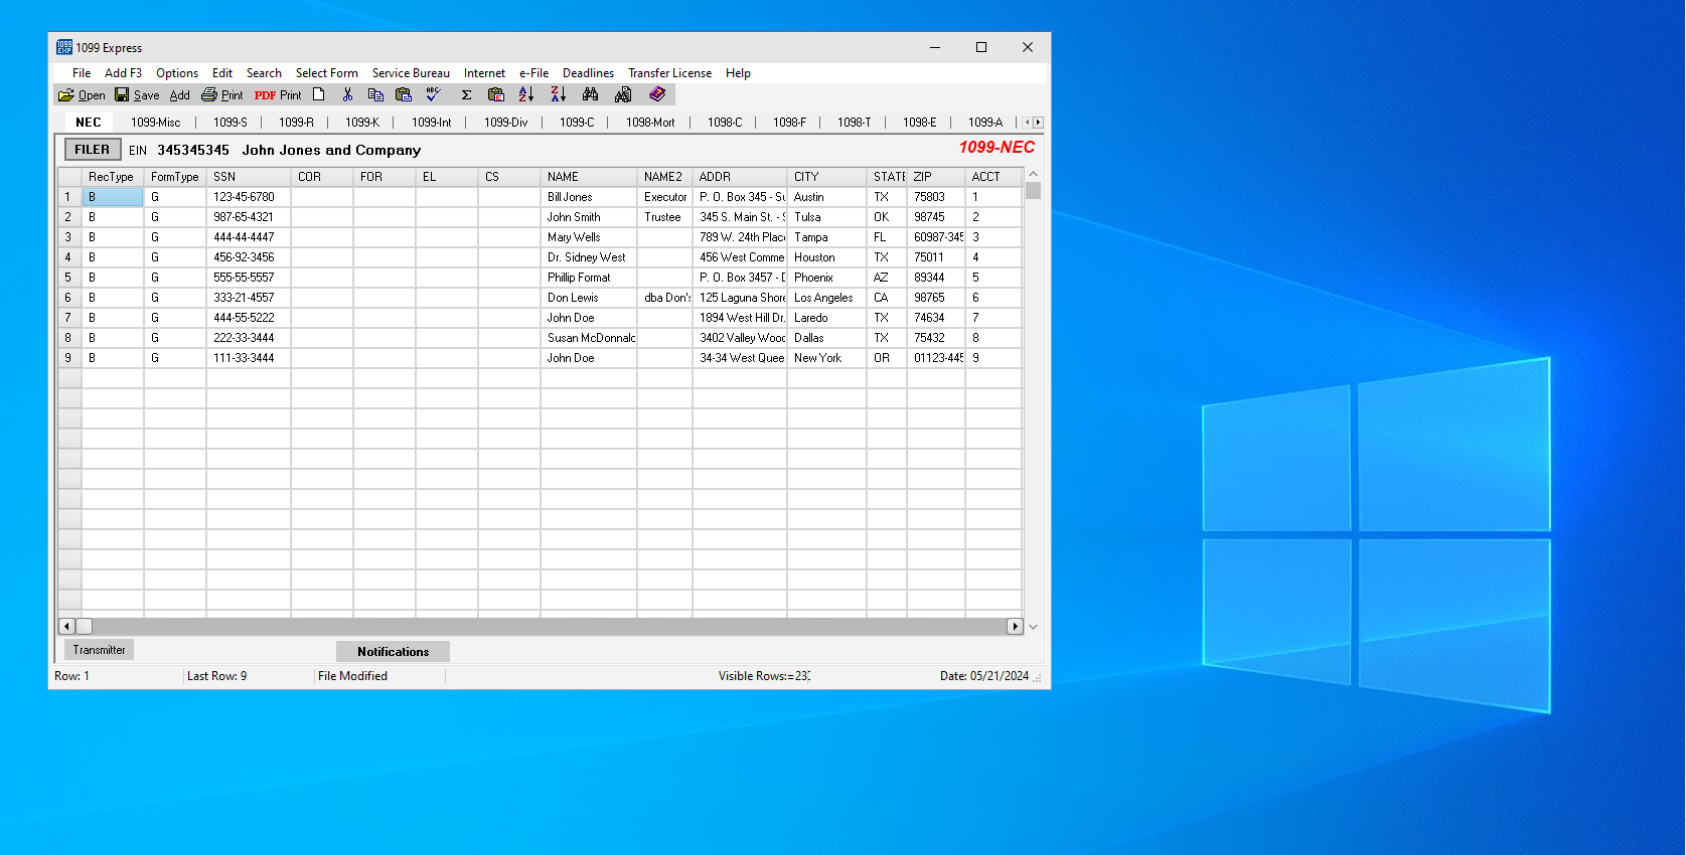
Start by opening the original file that contains the recipient(s) with incorrect information.
Please be sure to not revise/remove any information within the original file!
STEP 2:
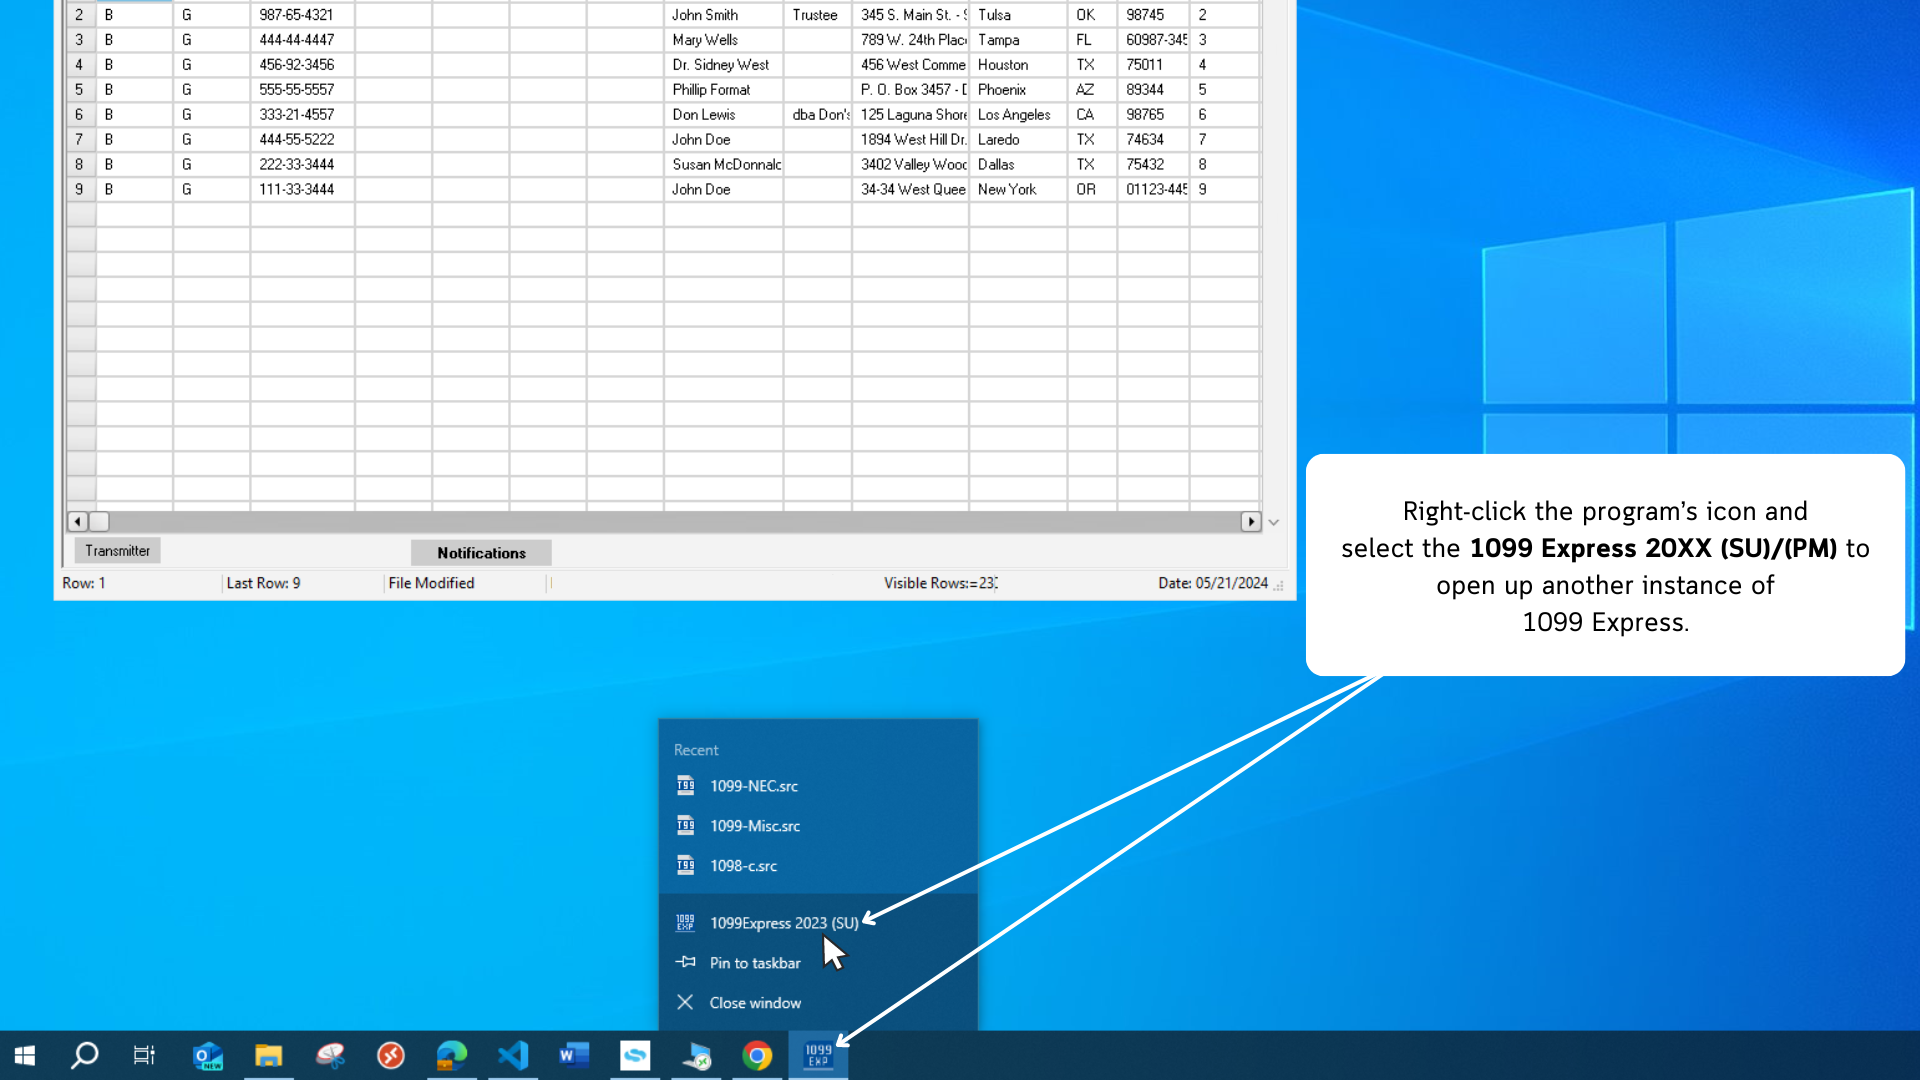
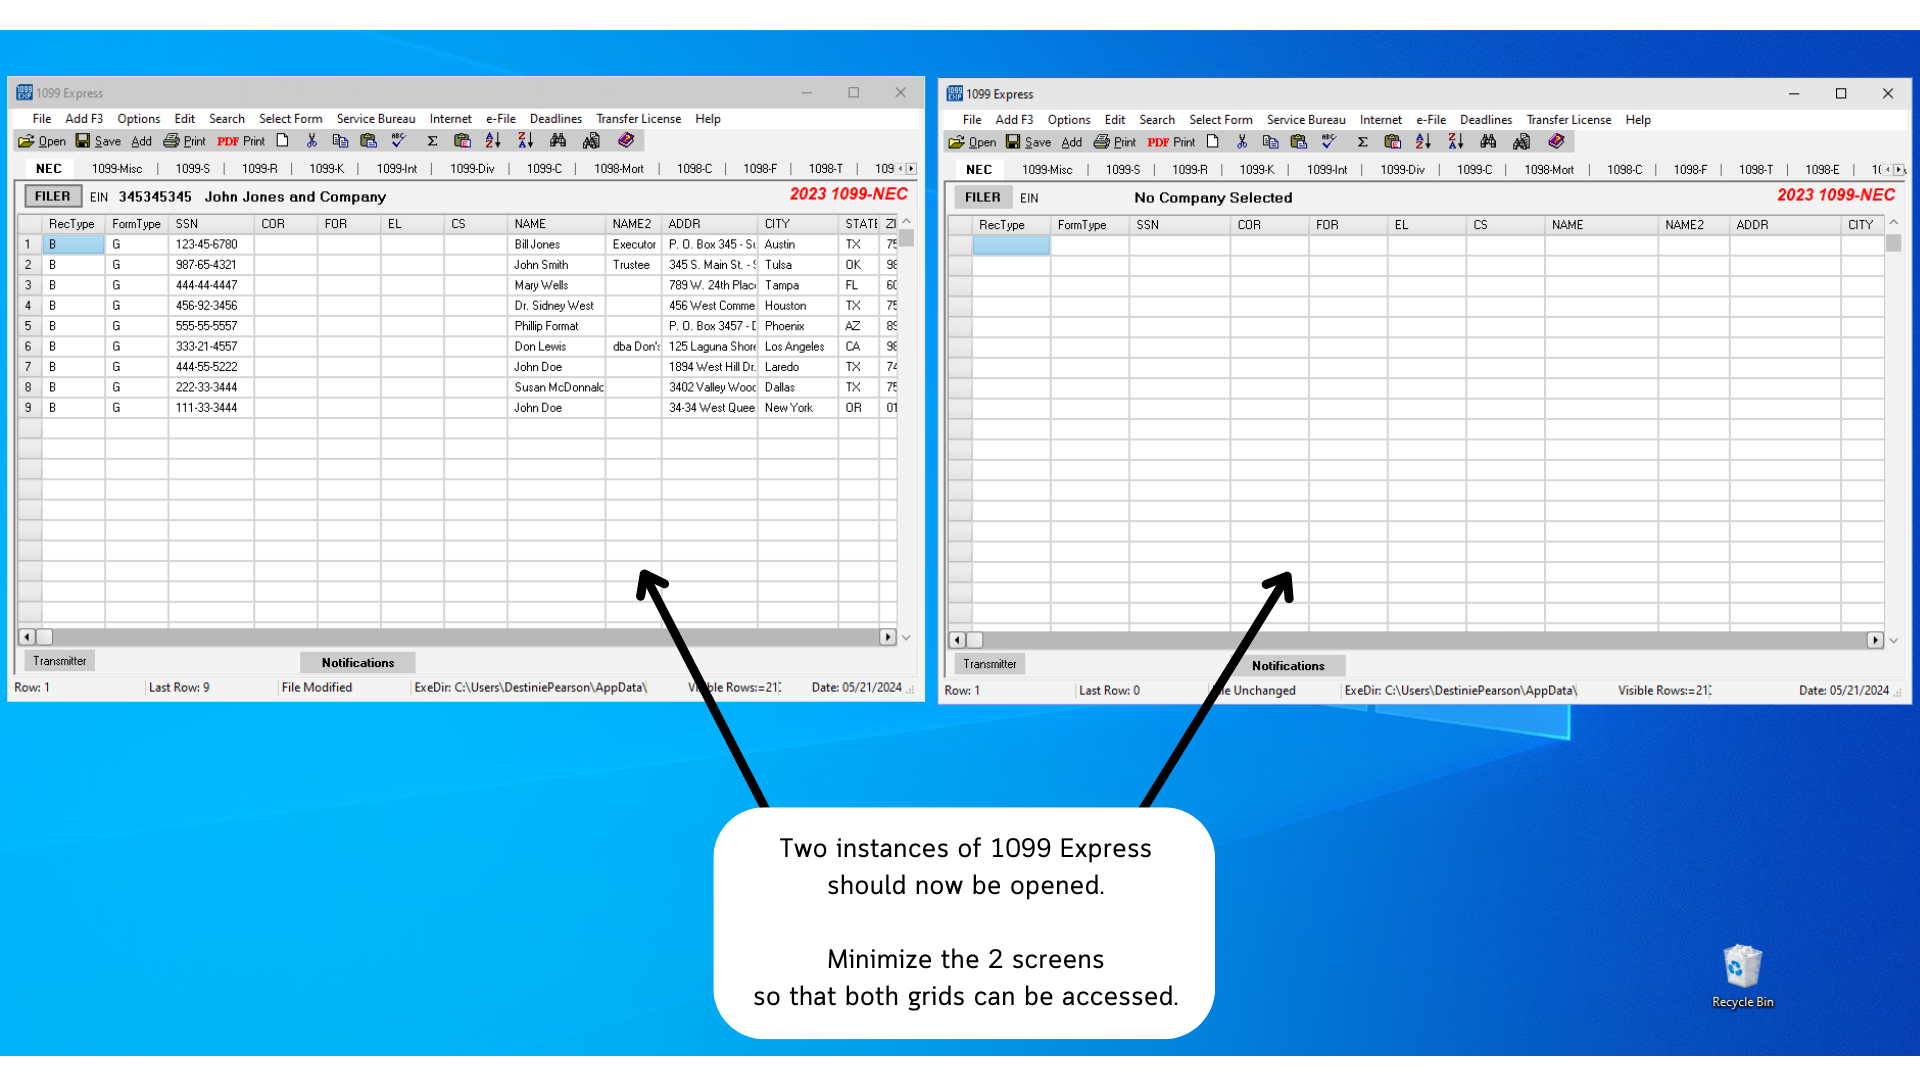
Once the file is opened, go to the taskbar at the bottom of the PC screen and right-click the 1099 Express program icon.
A pop-up list will appear, select the
1099 Express 20XX (SU)/(PM) option to open another 1099 Express window. It will prompt another pop-up that will ask 'Run another copy?', select Yes.
STEP 3:
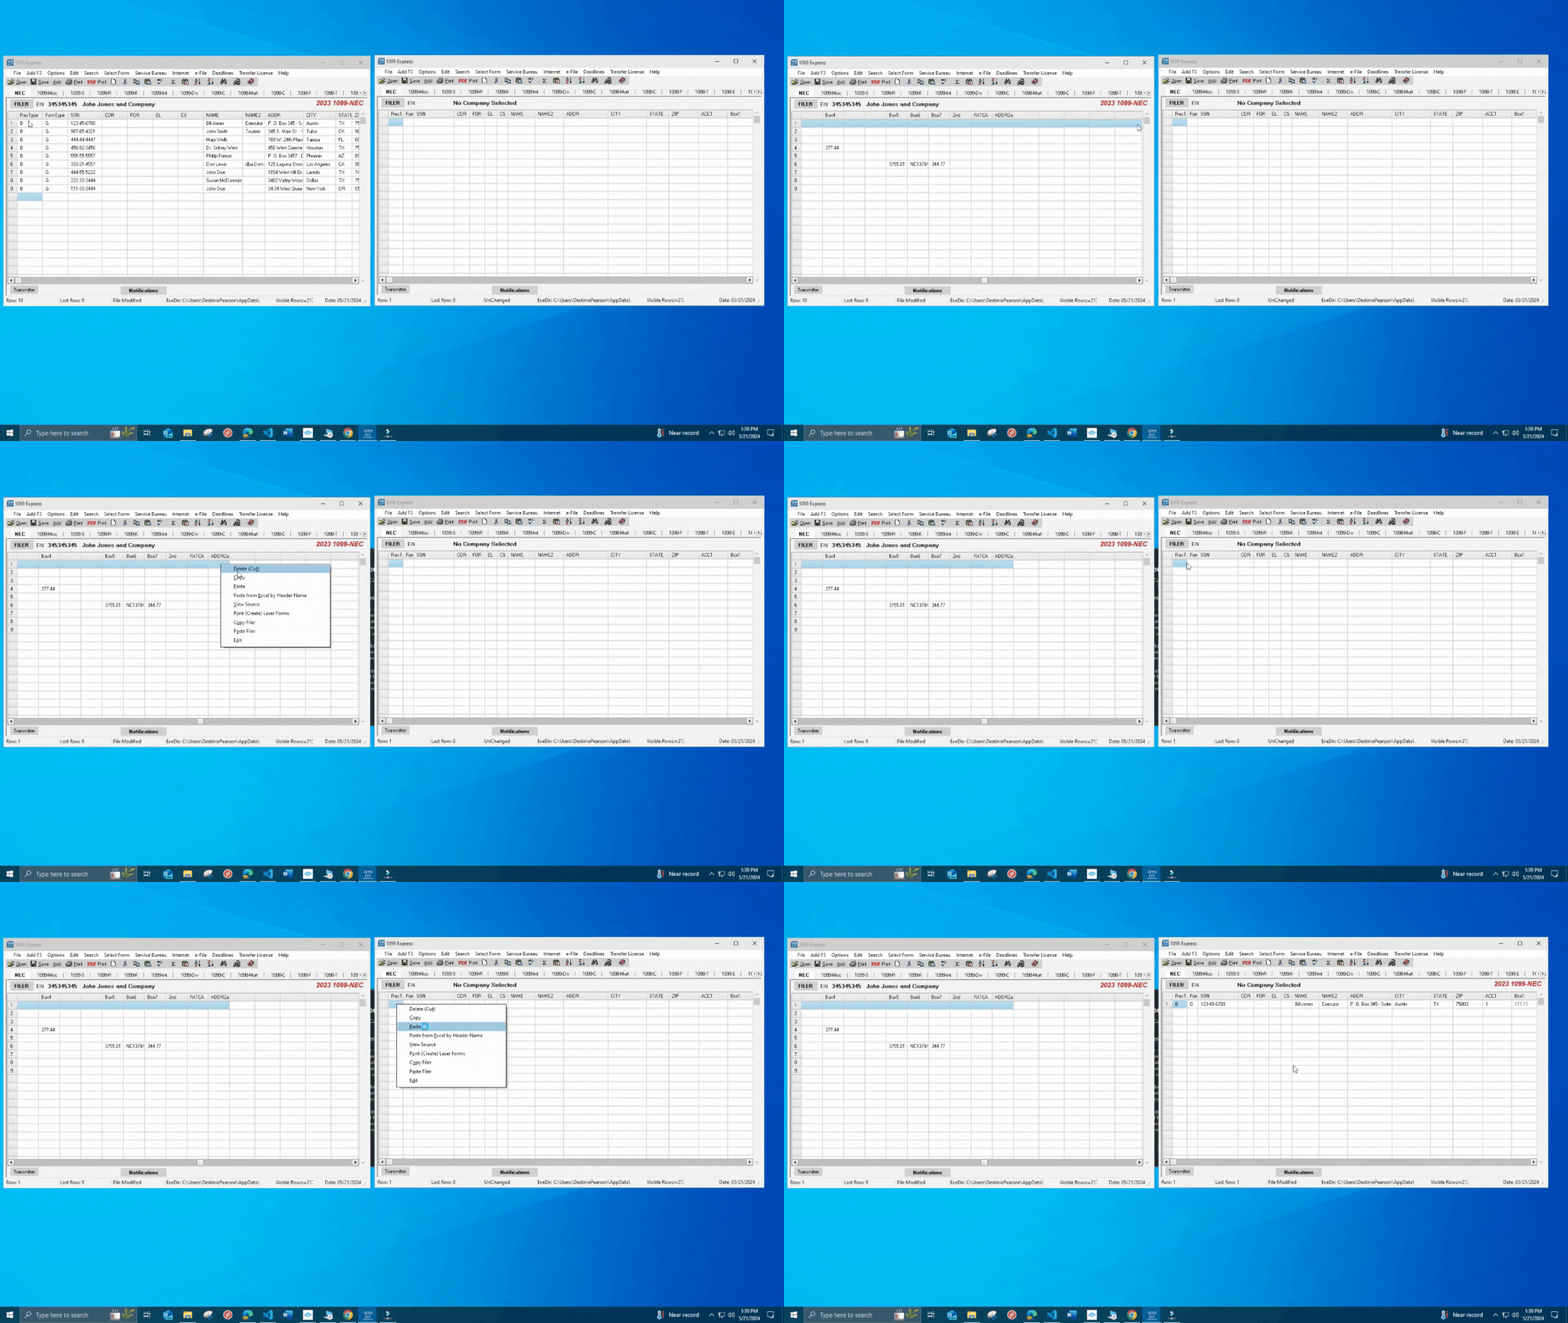
Now that two grids are opened, highlight only the recipient(s) needing corrections.
This can be done by clicking into a cell and dragging the selection across each column.
With the recipient(s) now highlighted, right-click on the blue section and select 'Copy'.
After the recipient data is copied, return to the new blank grid, right-click and select 'Paste'. A window will populate stating 'You should probably be using Paste from Excel By Header Name',
bypass this window by selecting 'Paste' as the data is only being transfered from program to program.
STEP 4:
With the new file now containing the recipient(s) data, double-click the recipients' name to open up their form window.
Information such as their amounts, address, code or box can be
updated/revised.
For indivduals who should not have been reported, zero (0.00) out their dollar amounts.
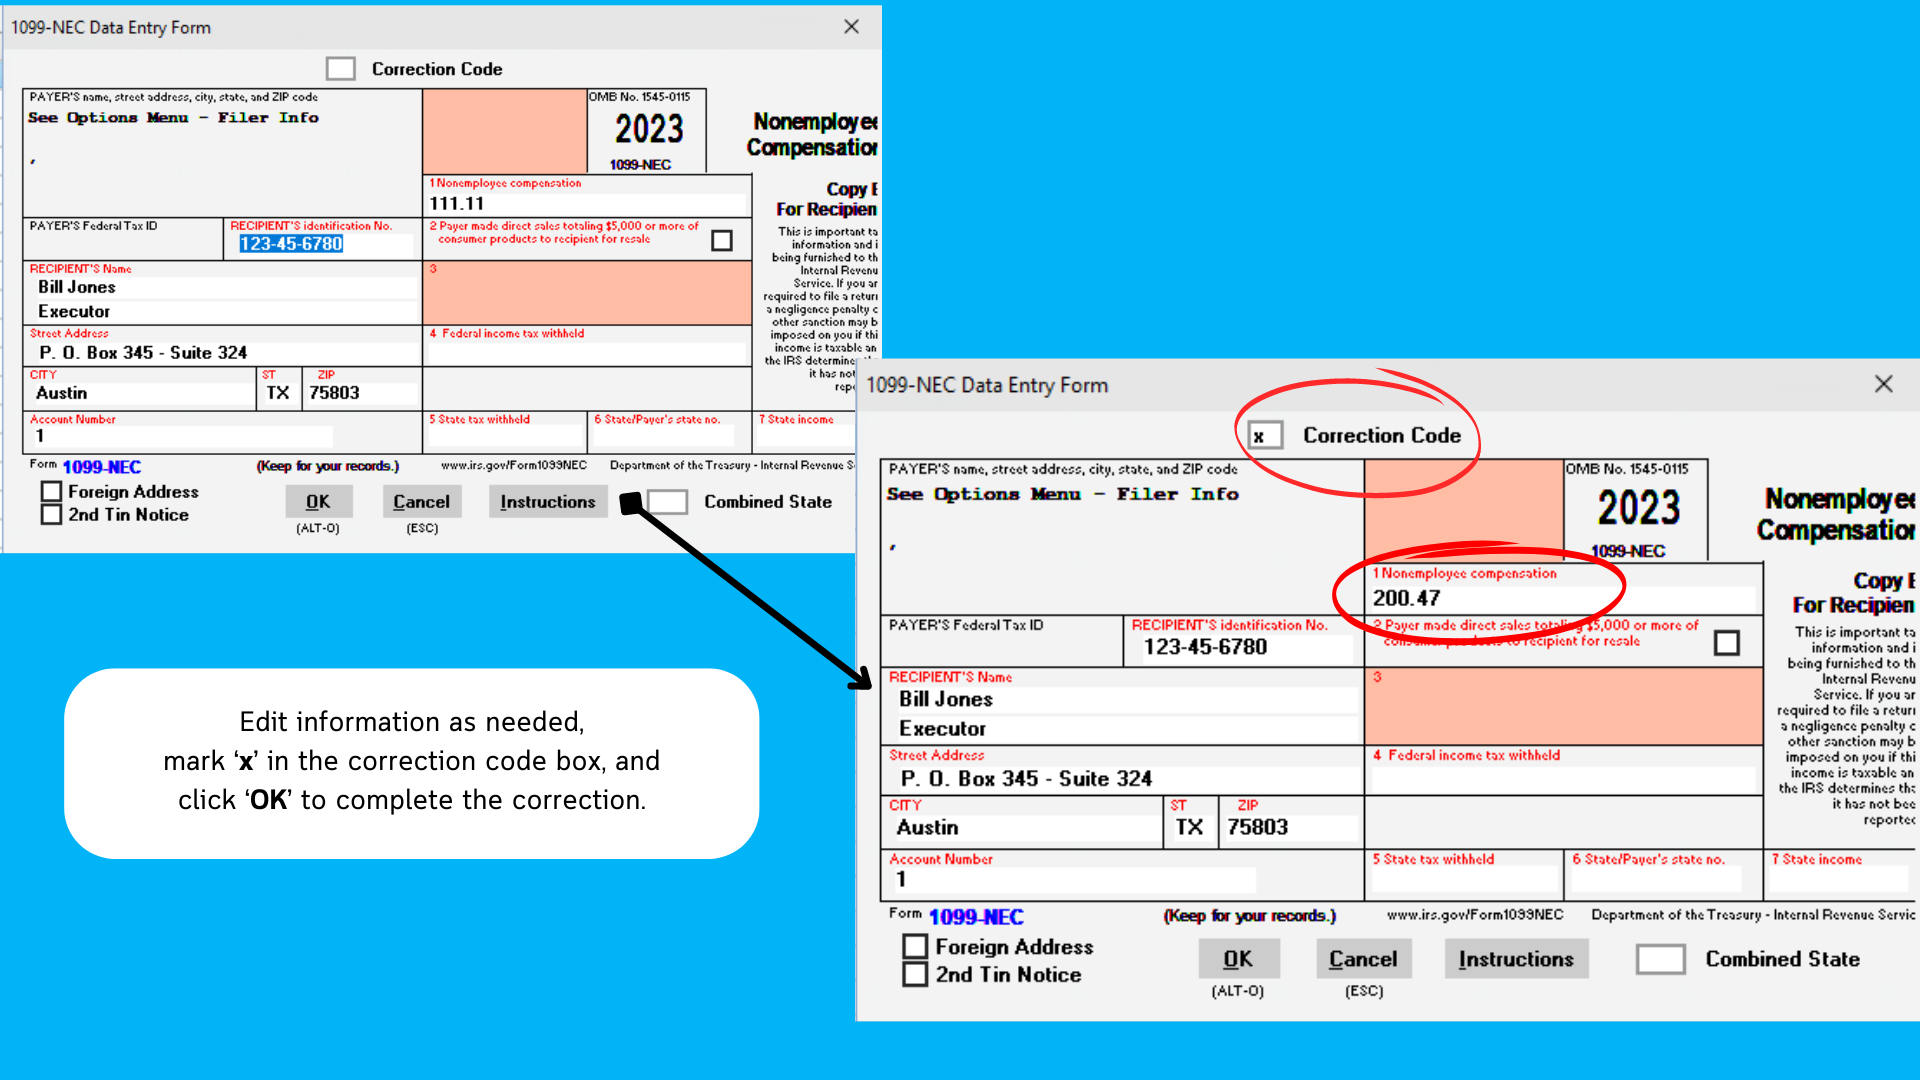
Make sure before clicking 'OK' to mark the Correction Code box with the letter 'x' to indicate that the form is a correction.
STEP 5:
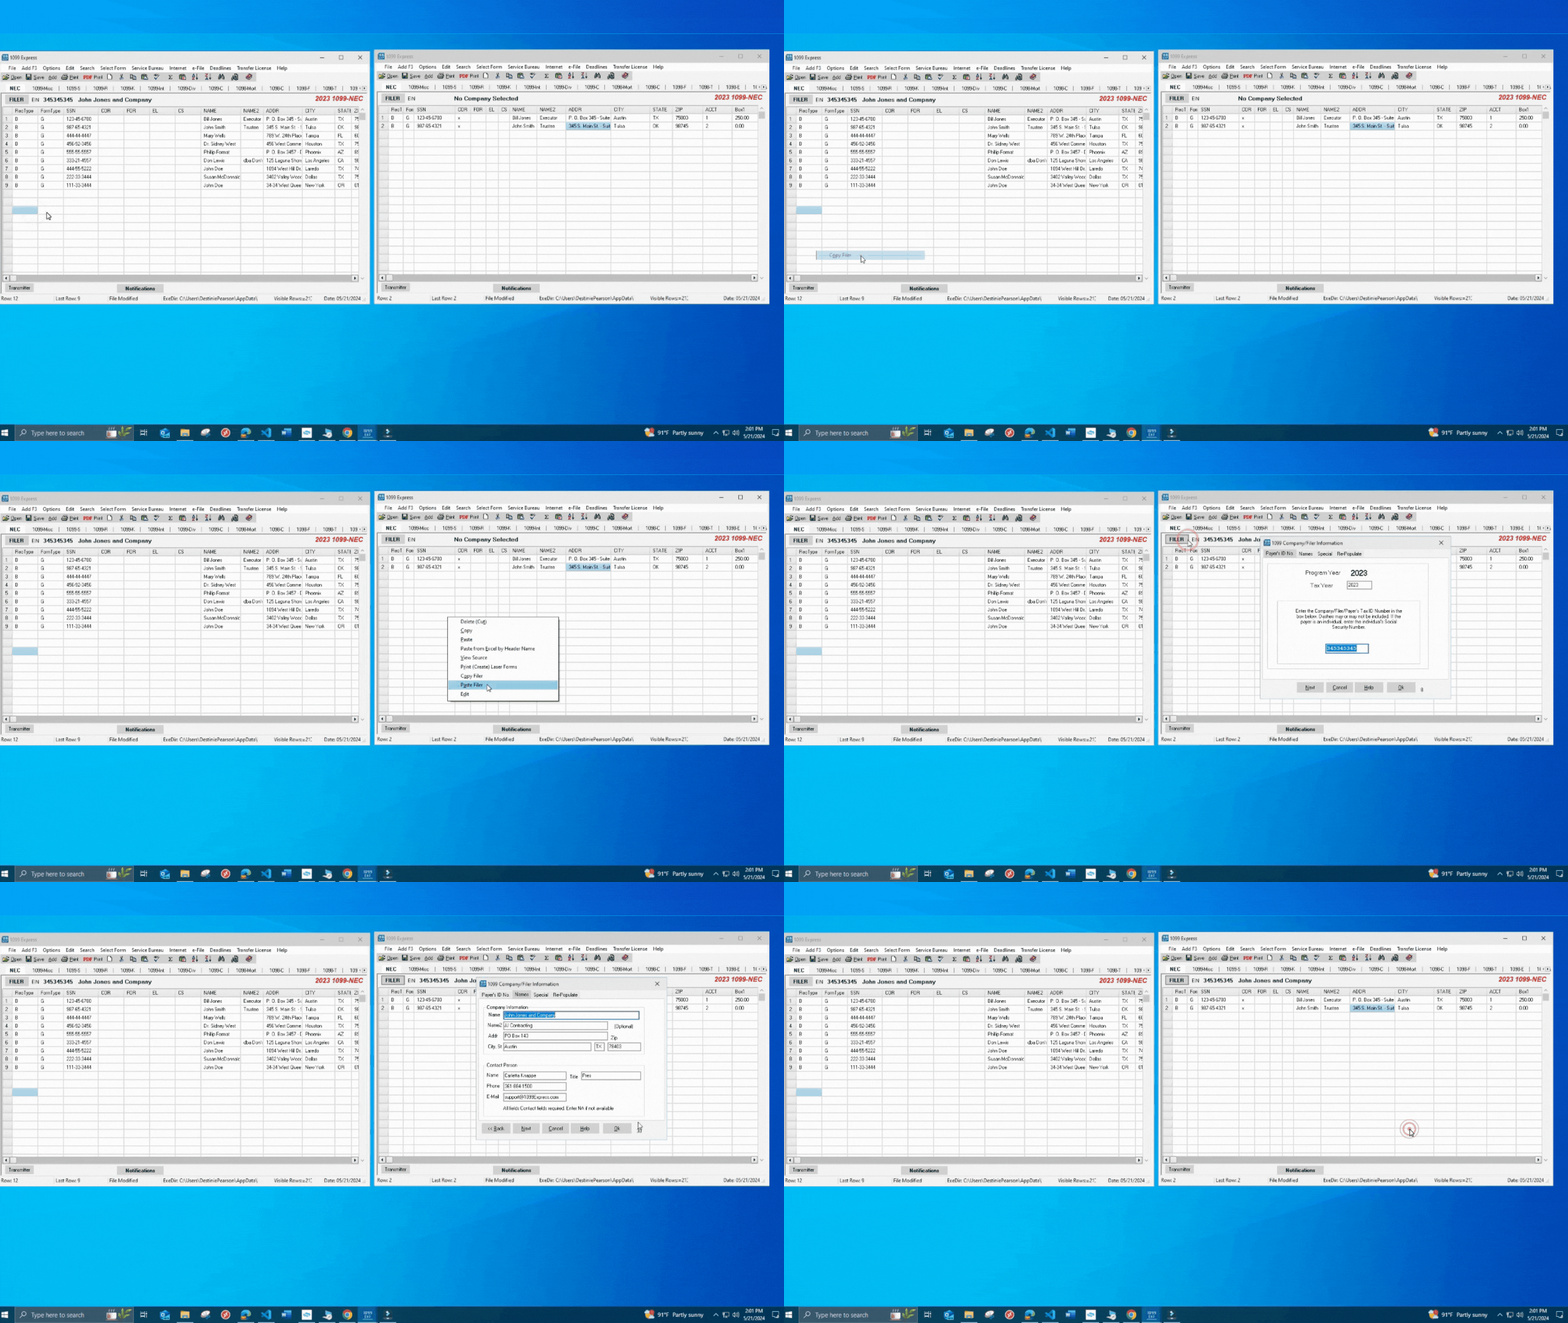
Once all steps above are completed (recipient data has been revised and marked with an 'x') return to the original file.
Right-click into the grid of the original file, and select the option 'Copy Filer'.
After the Filer information has been copied, return back to the correction file and right-click the grid to select 'Paste Filer'.
This action will transfer all the Filer (Company) Information so that it does not need to be re-entered manually.
A Type-2 Correction will require 2 forms to complete the correction.
STEP 1:
Start by opening the original file that contains the recipient(s) with incorrect information.
Please be sure to not revise/remove any information within the original file!

STEP 2:
Once the file is opened, go to the taskbar at the bottom of the PC screen and right-click the 1099 Express program icon.
A pop-up list will appear, select the
1099 Express 20XX (SU)/(PM) option to open another 1099 Express window. It will prompt another pop-up that will ask 'Run another copy?', select Yes.

STEP 3:
Now that two grids are opened, highlight only the recipient(s) needing corrections.
This can be done by clicking into a cell and dragging the selection across each column.
With the recipient(s) now highlighted, right-click on the blue section and select 'Copy'.
After the recipient data is copied, return to the new blank grid, right-click and select 'Paste'. A window will populate stating 'You should probably be using Paste from Excel By Header Name',
bypass this window by selecting 'Paste' as the data is only being transfered from program to program.


STEP 4:
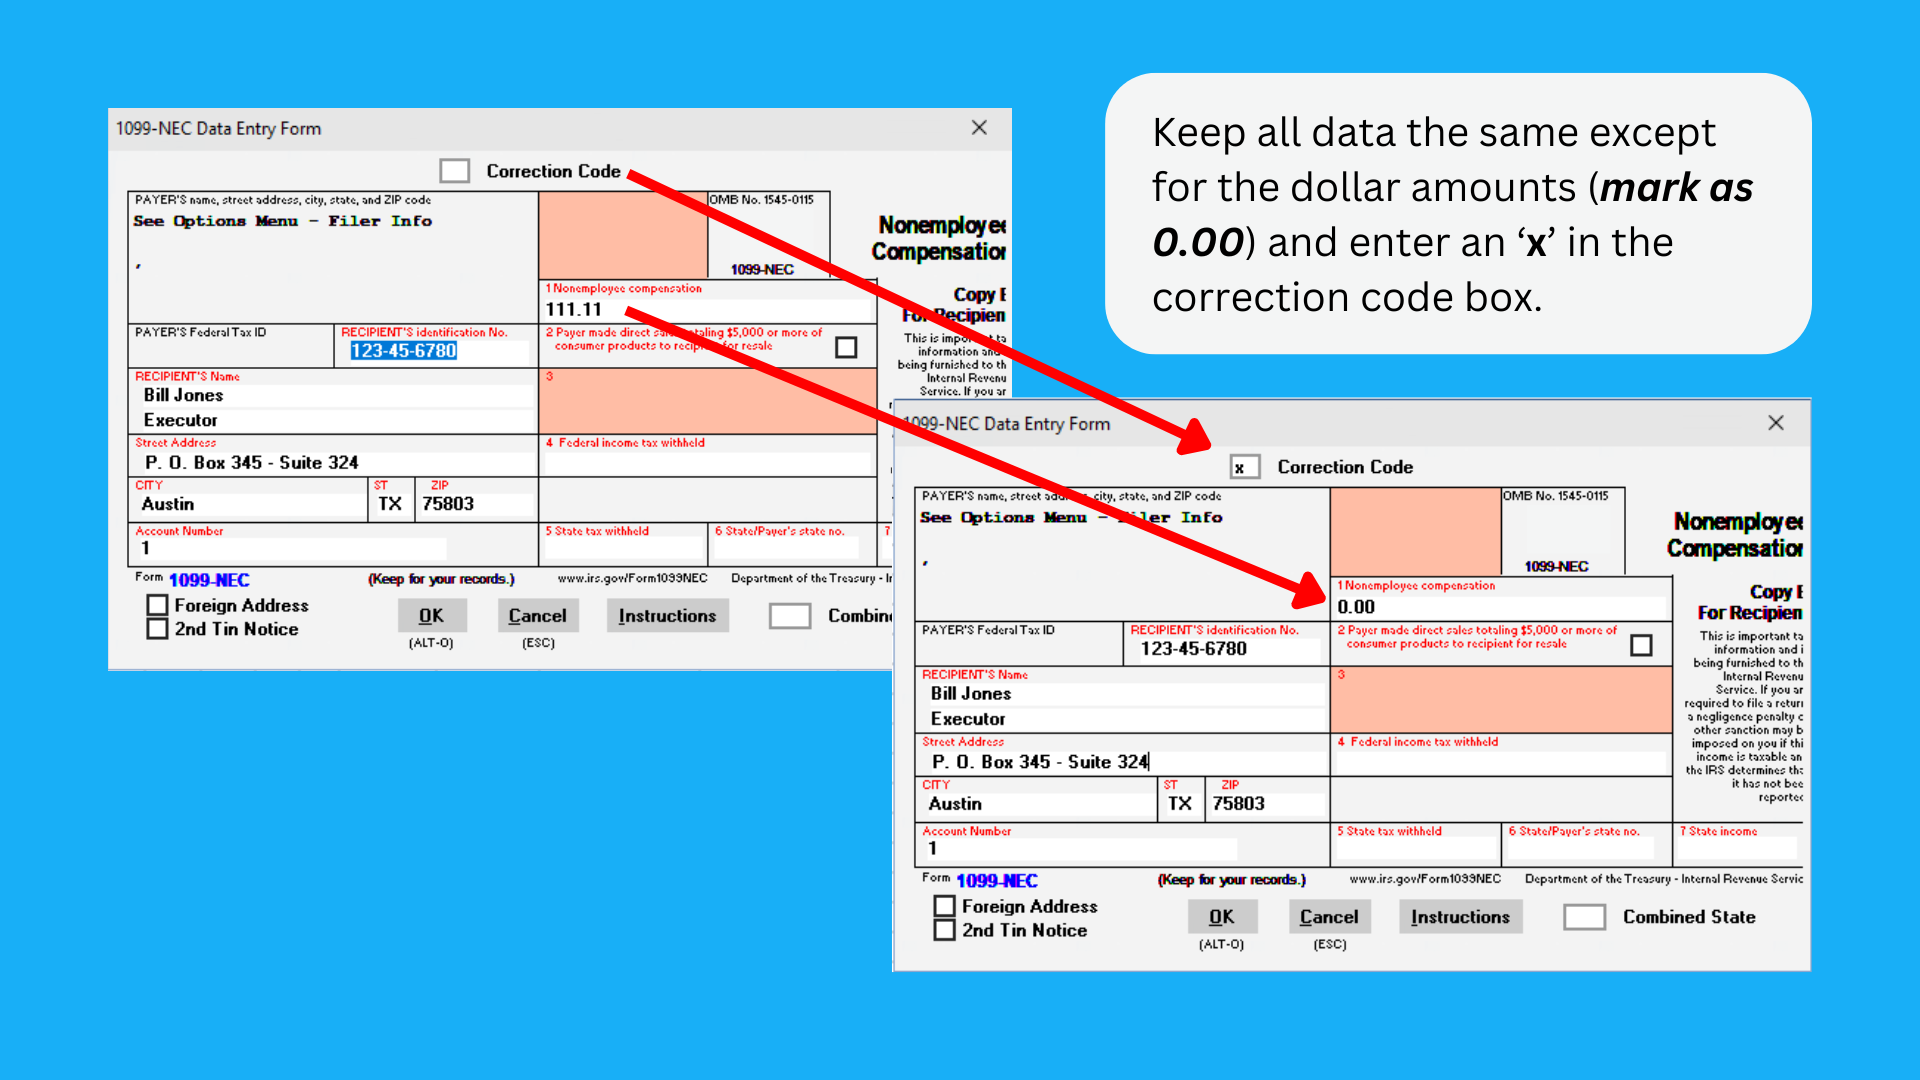
With the new file now containing the recipient data, double-click the recipients' name to open up their form window to manually adjust their information.
All amounts will need to be changed to zero (0.00). This will indicate to the IRS that the form will need to be voided.
STEP 5:
STEP 6:
STEP 7:
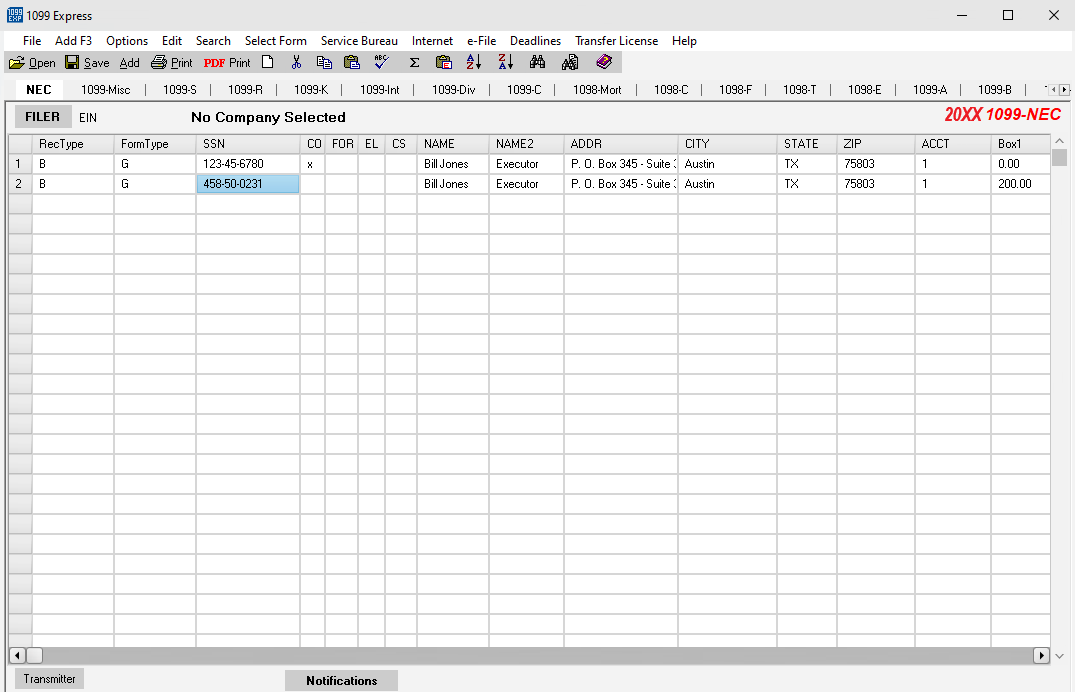
Once the first form is complete, copy the recipient's data as once done in step 3.
After the individuals data is copied, right-click the cell right under the first line and paste.
Double-click the recipients' name to enter all the data that should have been reported. The correct TIN (SSN/EIN/etc.), name, address and/or amounts.
Be sure to enter an account number for the new form and remove the 'x' from the correction code box. The second form will not be a correction, but more so
the replacement (what should have been reported) for that indivdual
Once all steps above are completed (recipient data has been revised and marked with an 'x') return to the original file.
Right-click into the grid of the original file, and select the option 'Copy Filer'.
After the Filer information has been copied, return back to the correction file and right-click the grid to select 'Paste Filer'.
This action will transfer all the Filer (Company) Information so that it does not need to be re-entered manually.

Last step is to save the file from the 'File' menu and select 'Save As'.
To create a Corrections file using the 1099 Express program's 'Corrections Wizard' features begins with opening the program.
*Please Note: This function is recommended for 1099Express Veterans and Excel Advanced users.
- Click on the Options drop down Menu; scroll down and click on Corrections Wizard. A gray message box will pop up, advising you to never change/alter an original file.
- Click OK.
- Another box will appear asking if the correction is for a person who was left out of your original file.
- If that is the case, click Yes and follow the advice in the next box
- If that is not the case, click No; when the next box appears, click OK.
- A File Explorer box will appear; locate the file that needs to be corrected
- Upon opening the selected file, the Corrections Wizard will open a gray box which must be filled out.
- Once the line number has been entered and the selection below has been made, click the ADD to Corrections File button. A message will pop up indicating the actions taken.
- The new correction file should be on your screen as well. If additional correction forms are needed, repeat the process in the gray and ADD to Corrections File as many times as is necessary.
- Once it is confirmed that all corrections are included, click Finish and Save Corrections File.
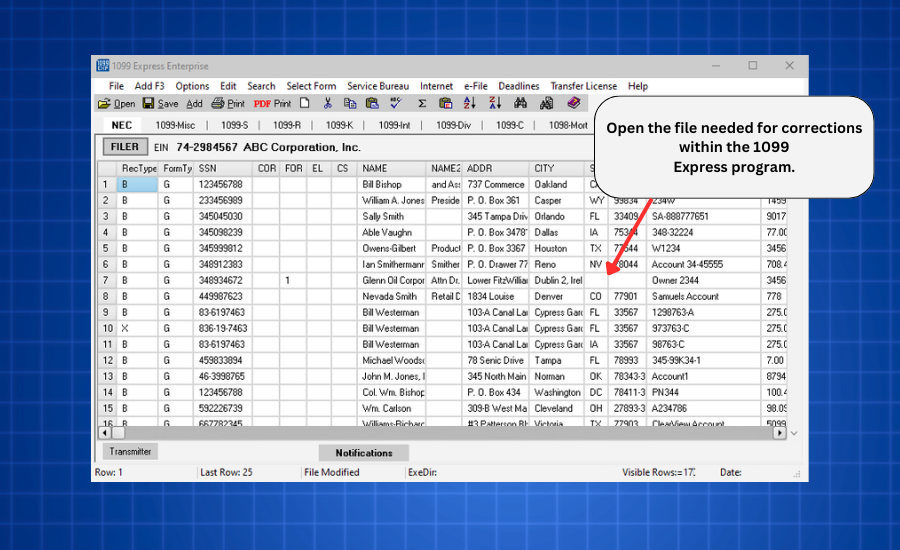
To create a Corrections file using the 1099 Express program's 'Extract Corrections to new File' feature begins with opening the program.
- Navigate to the file that requires a correction. Upon opening the file, locate the payee(s) which require a correction and double click their name.
- A small form will pop up with the payee information displayed. Put an X in the correction code box and click Ok to save and close the form.
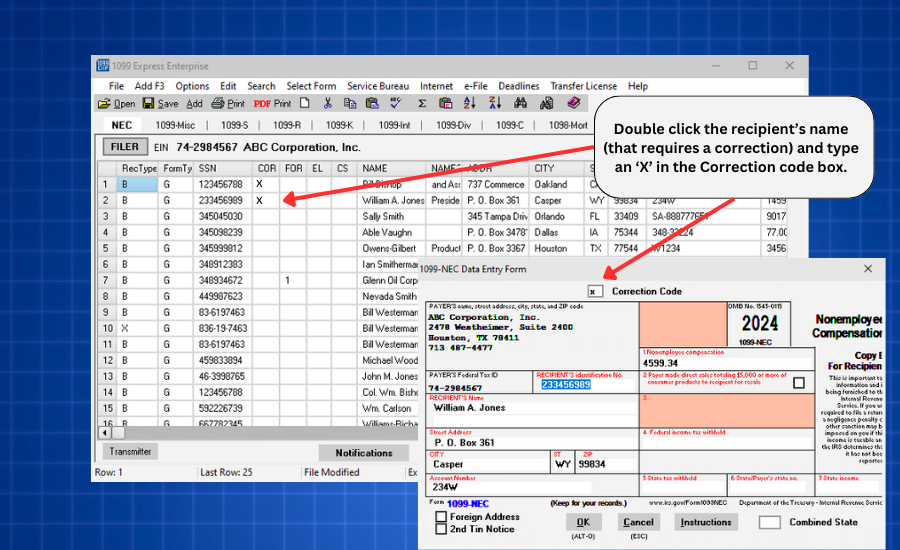
- Repeat this process for additional payee(s) if needed.
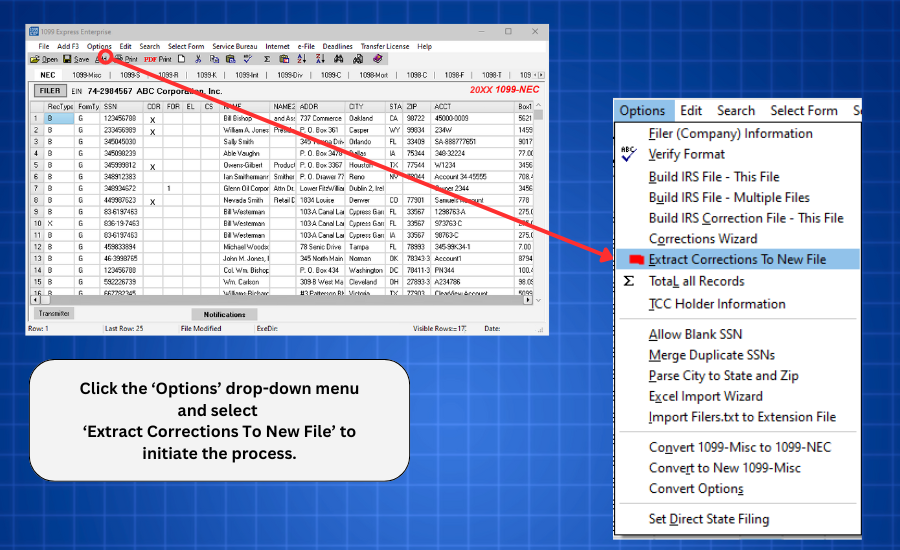
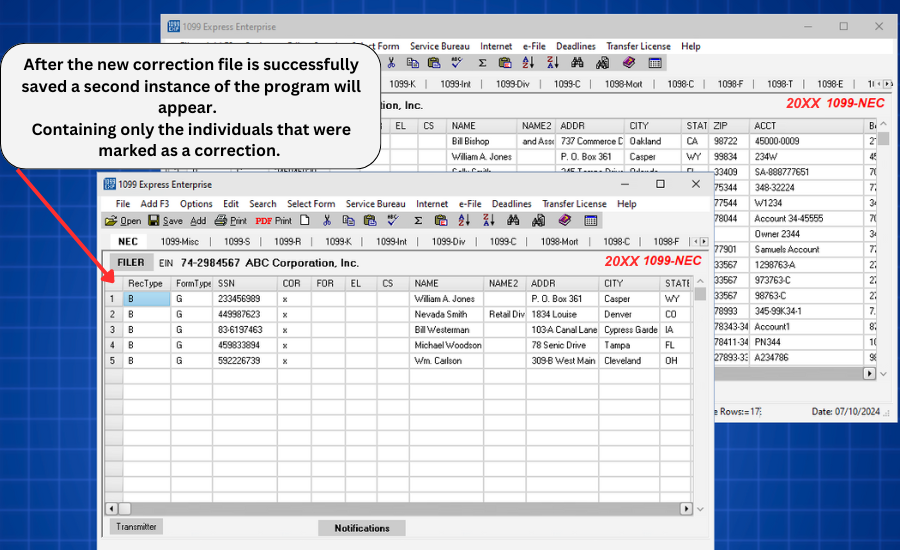
- Click on the Options menu; scroll down and click on Extract Corrections to new File.The program will create a correction file with the selected payees;
save this file in the desired location.
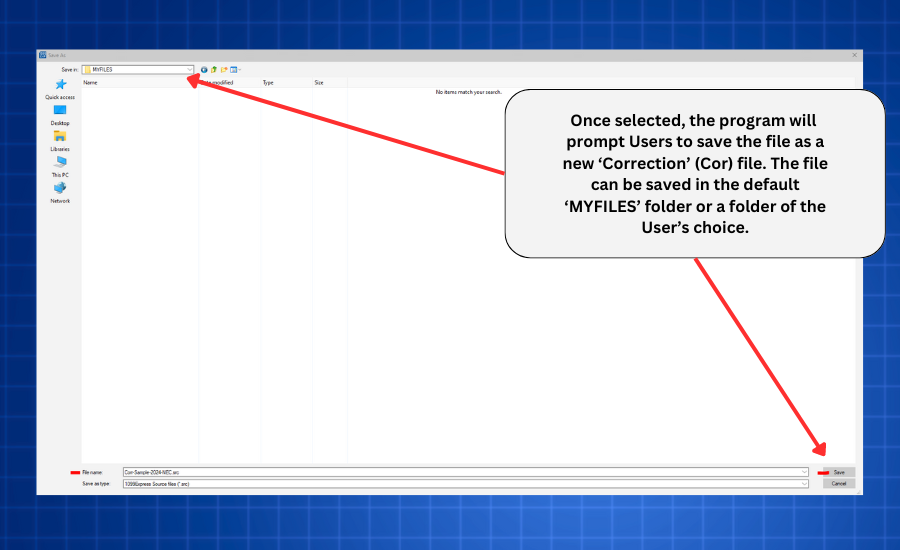
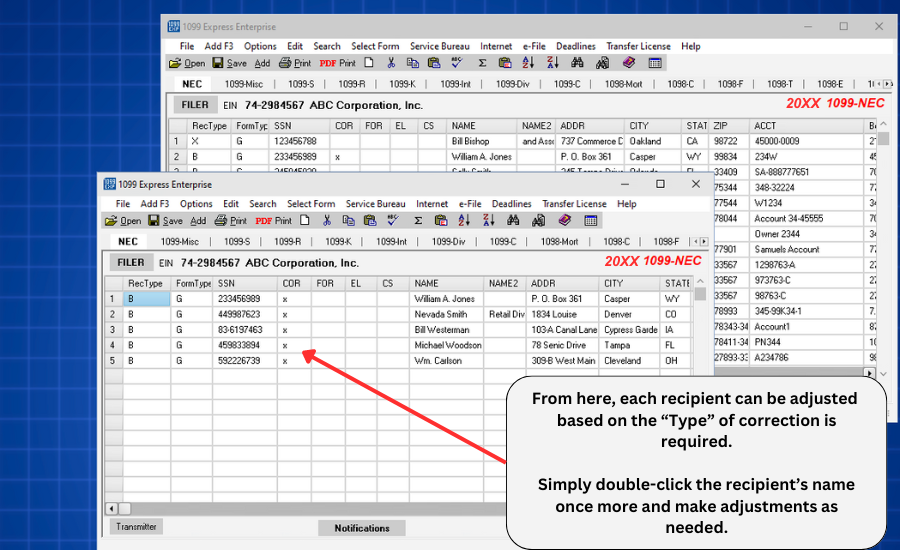
- The Original file will remain open while the new Correction file will open next to the Original.
For more information on the different "Types" of corrections, please visit the link provided here: Types of Corrections
For further instructions on how to finish the correction file recently extracted, please continue below.
Type 1 Corrections
- In the Correction file, click on each name and make the necessary changes. Click Ok to save and close the form. Repeat the process as necessary for additional payees.
Type Two Corrections
- Type 2 corrections require two forms to resolve the problem.
- With the 'Extract Corrections to New File' feature, the selected names will transfer to the new file only one time.
- Therefore, it will be necessary to copy each payee a second time once working in the Correction file.
- Click on the name of the payee which will then be highlighted blue. Right click on the blue line and click copy.
- Click on a blank line within the Correction File, right click paste. A message will pop up saying “You should probably be using 'Paste from Excel by Name'.
- Click Paste since you are not in Excel. The name will be added on that line.
- Repeat this process for each of the Type 2 corrections.
- For all Type 2 corrections in the Correction File, each name should be listed twice.
- Click on the first name; make sure the correction code box has an X in it.
- Next, put 0.00 in the money box and click OK to save and close the form. This essentially “zeros” out the form that was previously filed.
- The next step is to click on the corresponding name, remove the X from the correction code box.
- This form is not a correction, but rather what should have file initially. Make the necessary changes then click OK to save and close the form.
- Repeat this process for any additional Type 2 corrections.
*Type 1 & Type 2 corrections can be in the same file if this is preferred.
If an error is discovered in reporting the issuer's (not recipient) name and/or TIN, the issuer should write a letter to the IRS containing the following information:
Mail correspondance to:
Internal Revenue Service
230 Murall Drive, Mail Stop 4360
Kearneysville, WV 25430